Getting started
Crudiator is the world’s easiest plugin for creating custom table administration.
Crudiator is somewhat intuitive to use even if you don’t know much about how to use it, but if you read this document, you will learn that Crudiator can do a lot more.
This document will help you understand not only the basics of how to use Crudiator, but also how to use the custom settings to make your WordPress system more powerful than ever!
Why Crudiator?
Creating a custom table CRUD operation screen within the WordPress admin screen that complies with the WordPress UI will require some degree of program implementation.
I estimate that it will take about the following number of development days, depending on the functionality to be implemented.
- Browsing screens that only list and page through the data in a custom table … about 1 to 2 days
- Data add, edit, and delete screens with input forms based on data type … about 3 to 5 days
- Additional functions such as refinement, view, and export functions according to the client’s requirements … about 6 to 10 days
Of course, the number of development days depends entirely on the developer’s skill level and how much knowledge of WordPress he or she has.
So some people may be able to implement it faster than this estimate. (And vice versa…)
However, it is expensive to hire such an advanced programmer, and even an ordinary PHP programmer will have some development costs.
So with this Crudiator, you don’t have to be a programmer to create a CRUD screen for a custom table with no code.
Also, as far as I have researched, other similar plug-ins allow editing of all tables including WordPress tables, which is not safe, and the UI has its own style, which is not easy to understand.
WordPress generated tables (ex. wp_posts etc…) should not be editable as much as possible.
With Crudiator, you can safely create a CRUD screen for only the custom tables you need, and since it is styled according to the WordPress UI, it is familiar and easy to use for many people.
By using Crudiator, you will be able to build a system using WordPress with relative ease.
Installation guide
Installing Crudiator is easy.
Simply search for “Crudiator” in Plugins, install and activate it.

Basic Usage
This section explains the basic usage of Crudiator.
Menu Registration
After activating the Crudiator plugin, the Crudiator menu will appear, so register from there.
Click the “Add New” button on the Crudiator menu screen.
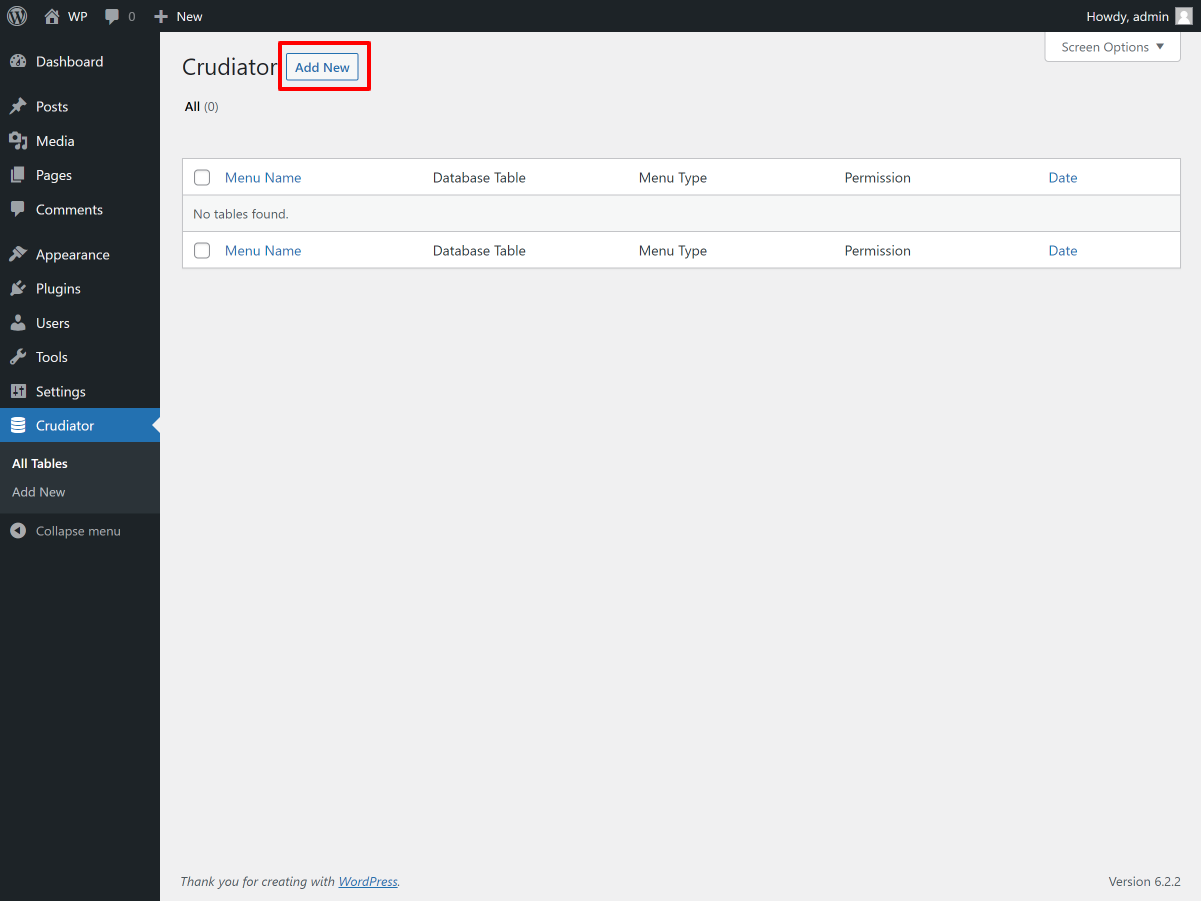
On the next screen, simply enter a menu name, select the target table for CRUD operation, and press the Publish button to register it as a menu.
For other items in the basic settings, please refer to the explanation in the screen.
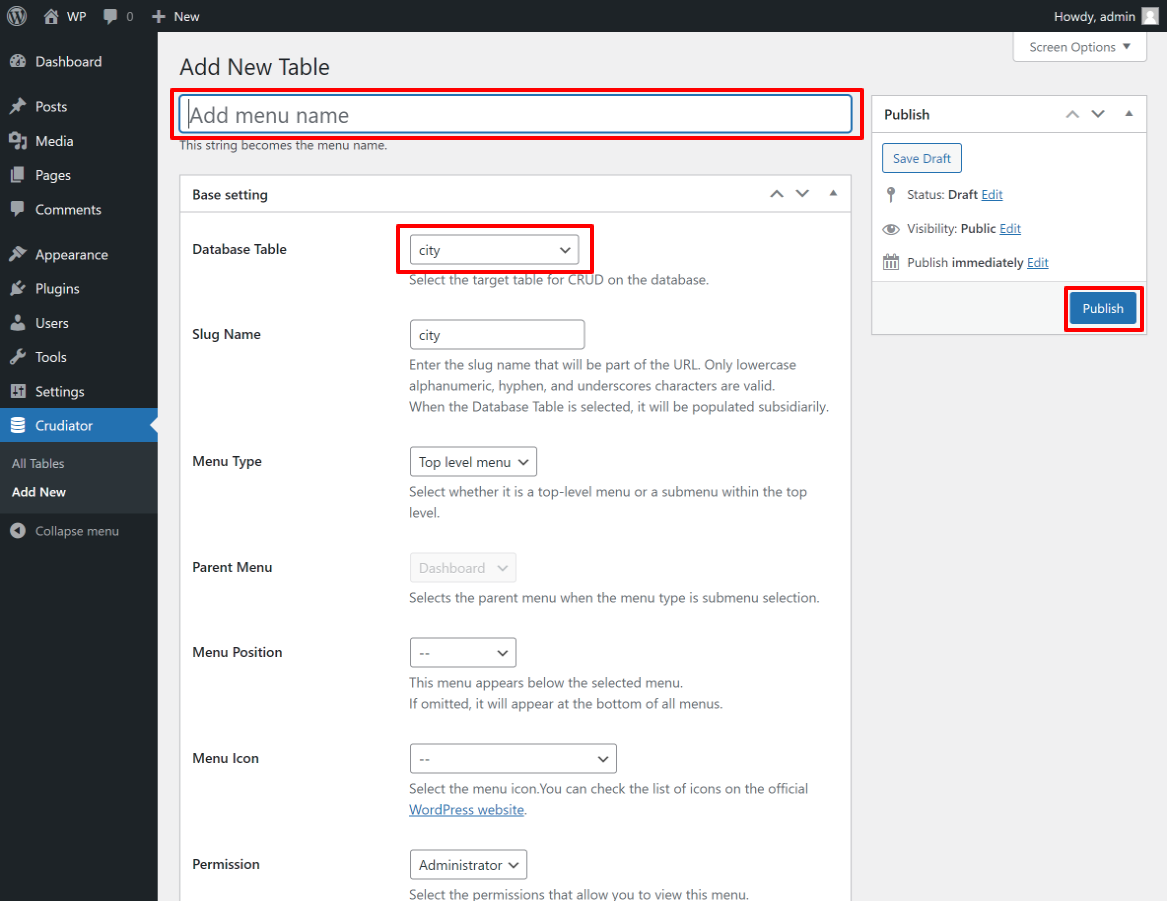
Menu RegistrationAt the bottom of this page you can add custom settings.
Custom settings are saved in json format. See the Custom Settings section of this page for more information on custom settings.
Data listing screen
As an example here, let’s import the world database from the MySQL sample data and register the country table. In addition, we will set the earth icon so that it is positioned above “Posts”.
Once registered, you will have a custom table management screen that follows the WordPress UI in an instant, as shown below. This is the data listing screen.
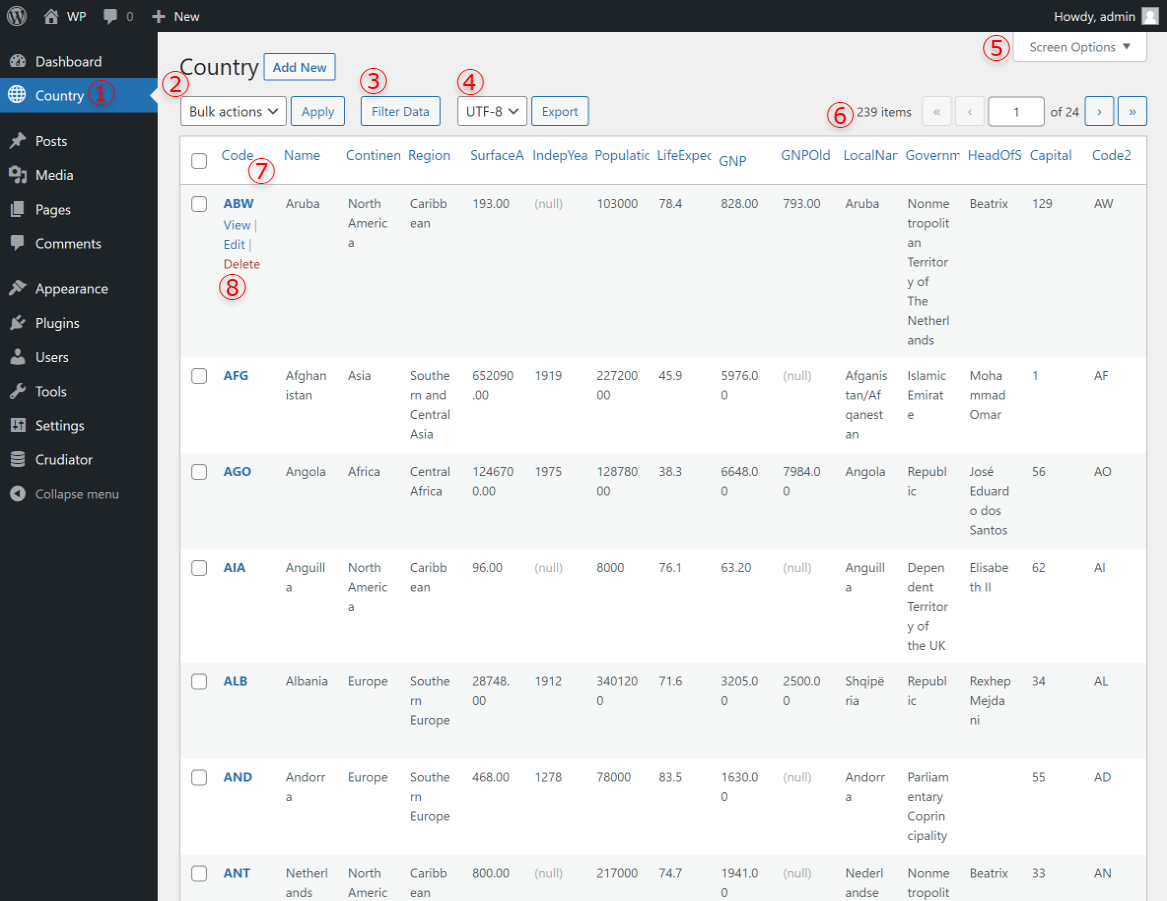
- Menu Name
The registered menu is displayed. - Bulk operation button
Use this bulk operation by checking the checkbox in the list view. - Filter data button
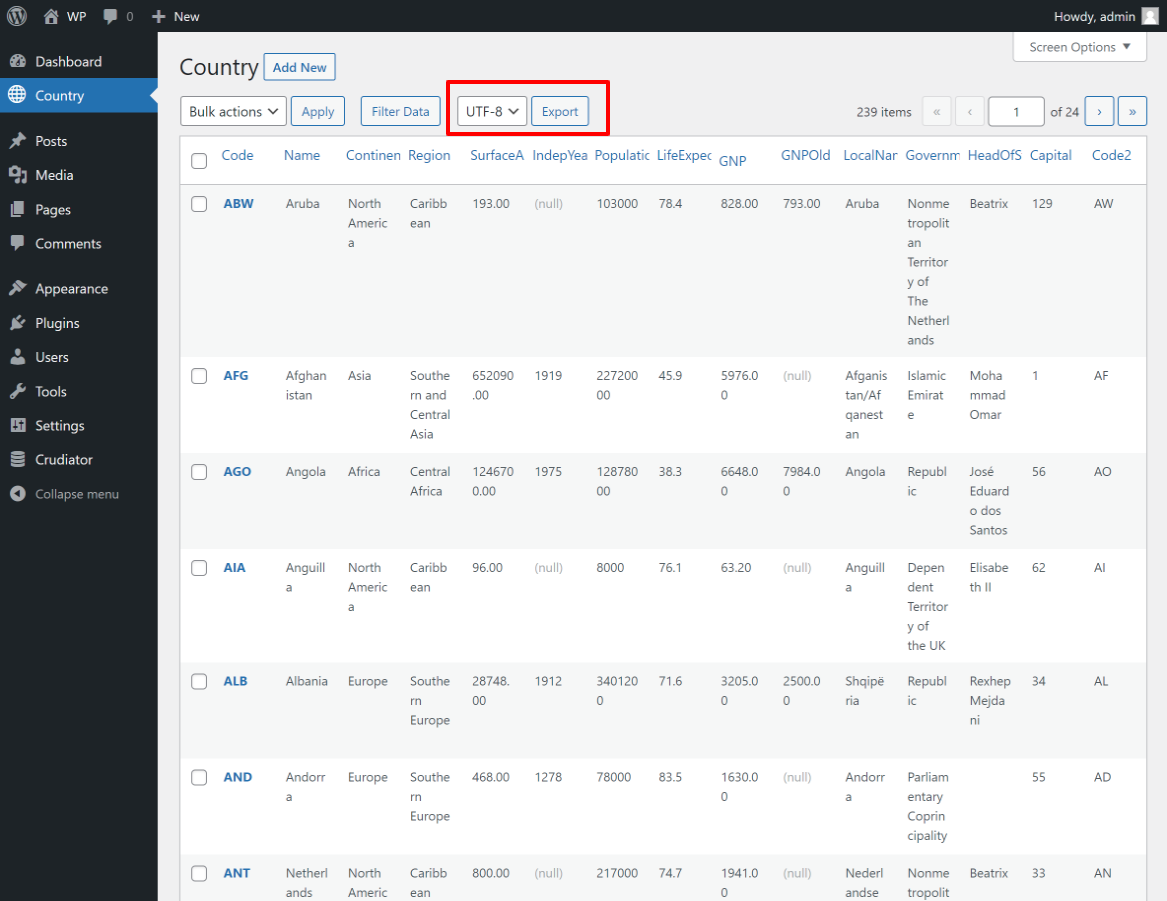
Allows you to filter data according to your criteria. - Export button
You can export data in csv format. - Screen Options
Toggle display/hide columns and change the maximum number of items displayed on a page. - Maximum Number of Data and Pagination
The maximum number of data items for this table is found here. - Sorting Data
Click on a column link to sort the data in ascending or descending order for that column. - Action link for one record
There are links to the view and edit screens for a single record and a delete link.
Using custom settings, you can change the column names to a clearer notation and limit the number of columns displayed here.
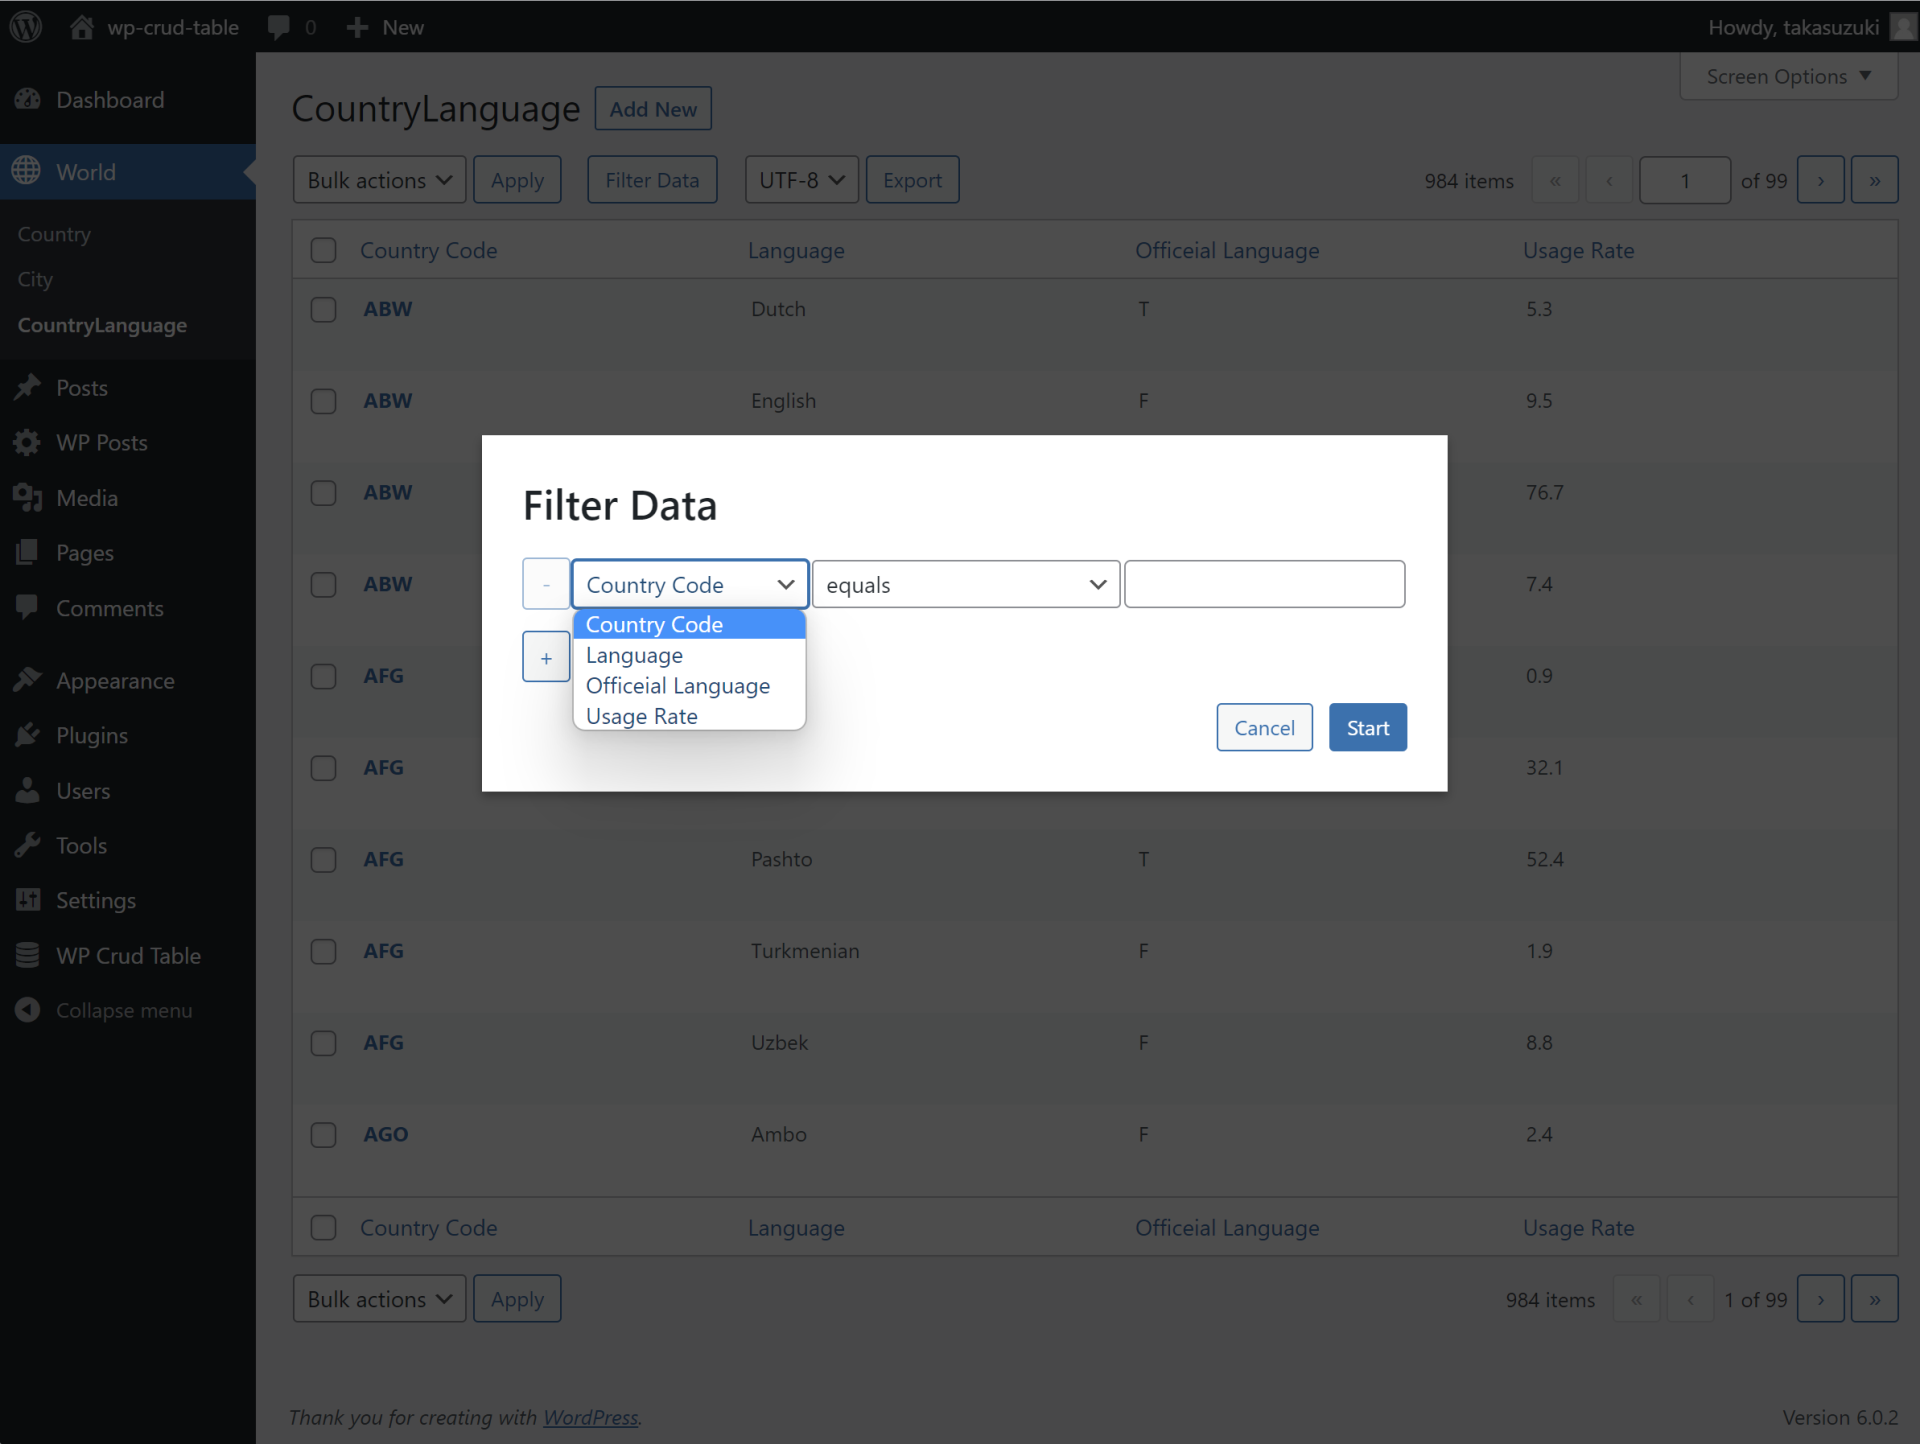
Data Filtering Function
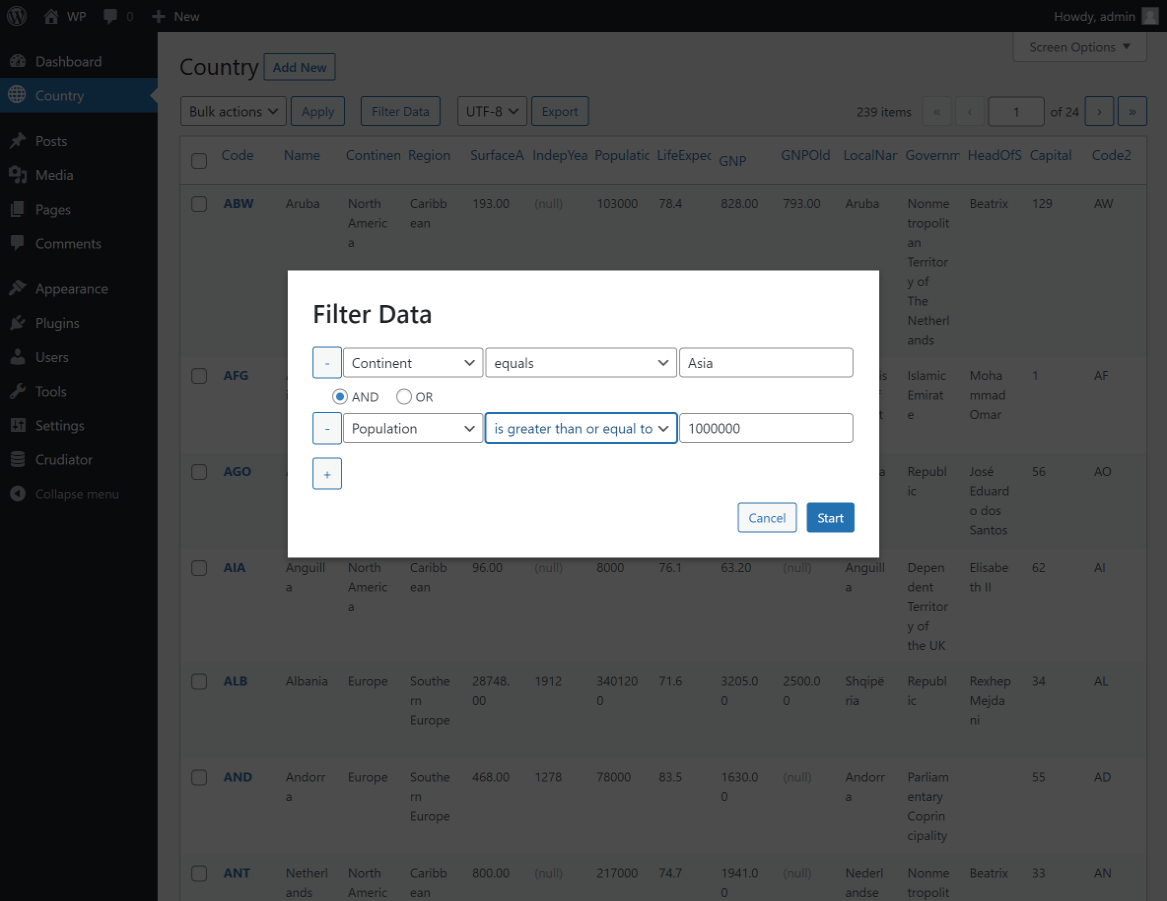
The data listing screen has a function for narrowing down data. This is an intuitive operation that allows you to narrow down your search using detailed search criteria.
To use this function, click the “Filter Data” button to display the filtering criteria dialog.
Here, you can easily select from the column options in this table and set a wide variety of comparison criteria. For multiple conditions, you can also specify “and (AND)” or “or (OR)”.
When the data is filtered, the criteria for filtering at that time are displayed at the top of the screen. Of course, the maximum number of records at this time will vary.

If you want to make sure that the intended SQL is being executed when you filter the data, the debug option in the custom settings can help.
Export function
Crudiator has a csv export function, which is commonly used for database table operations.
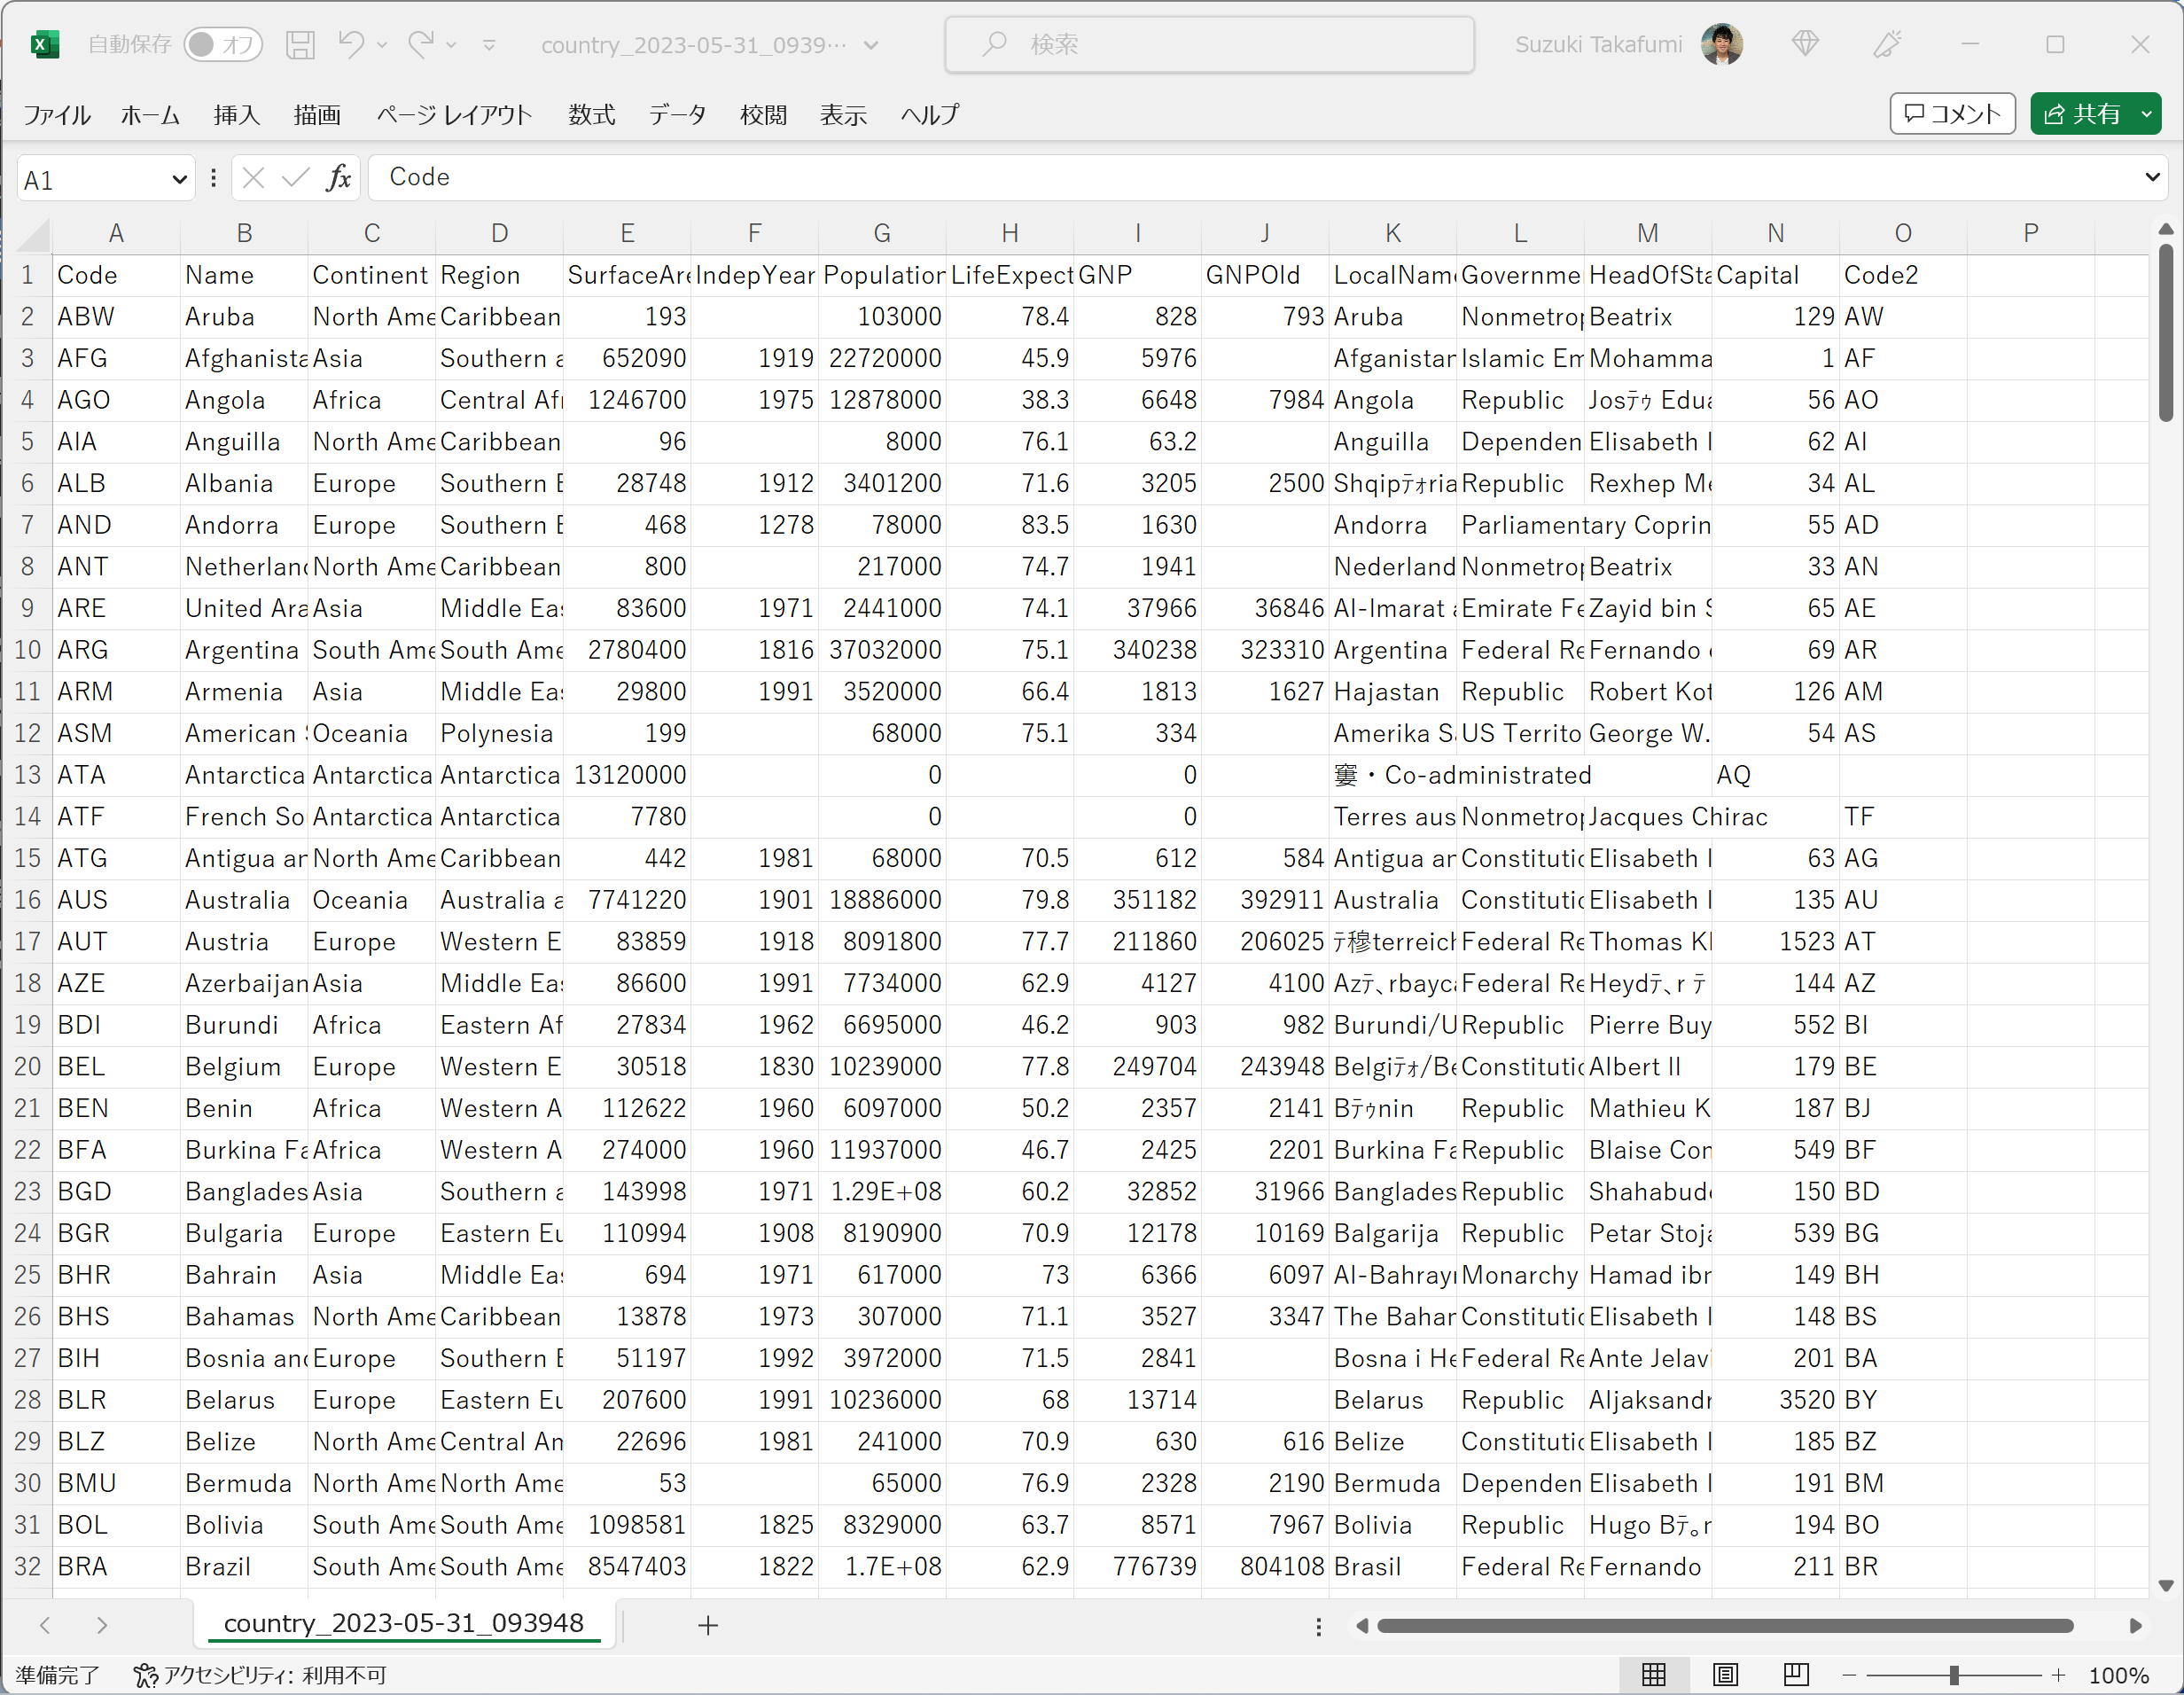
Click the “Export” button to immediately download the csv file.
The following image shows the downloaded CSV file. the header string on the first line can be changed to any string with the display_as option in the custom settings.
Data detail display screen
In the data listing screen, click on the value in the first column or the “View” link to go to the detailed data viewing screen.
Here you can see the values of all columns of a single record.

Add new data screen
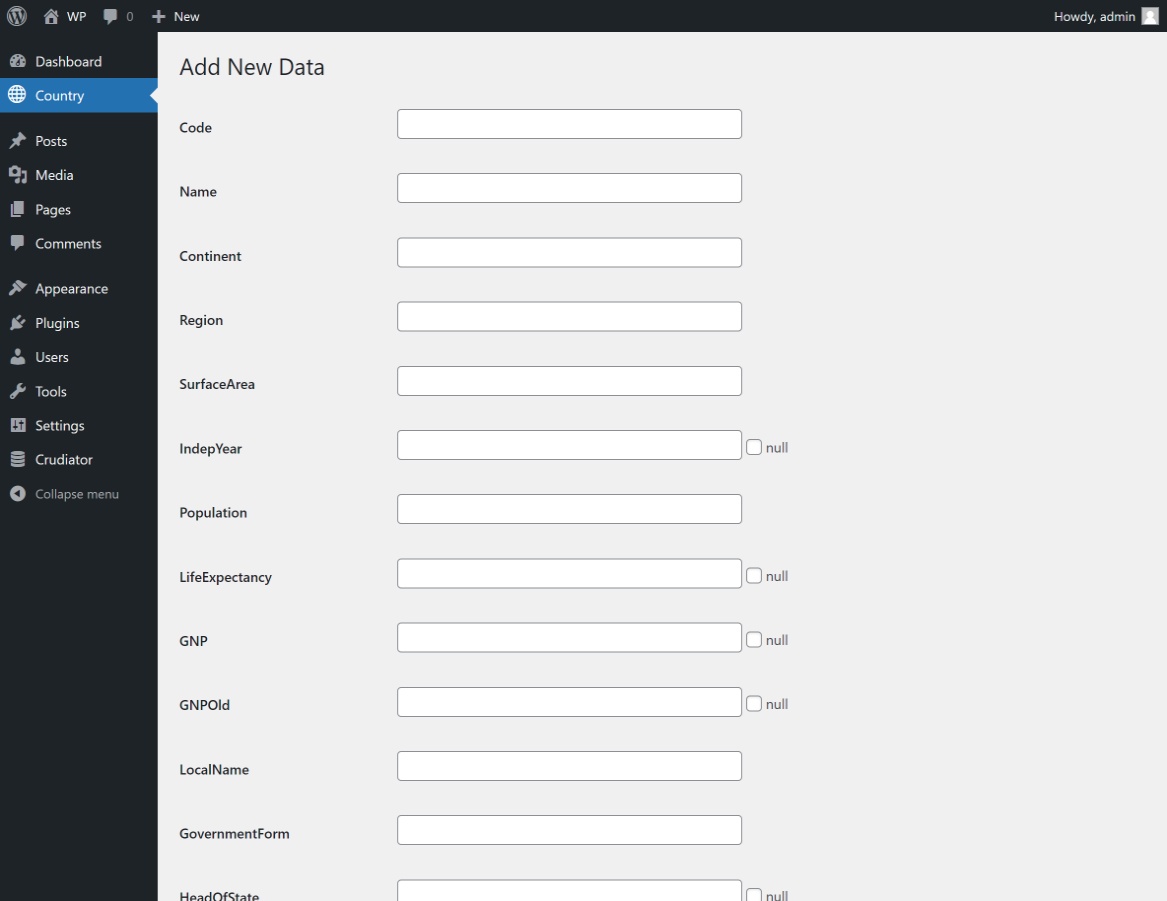
On the data listing screen, click the “Add New” button to enter a new data entry screen.
Here, an input form is automatically generated depending on the data type of the table column.
For example, the INT type allows only numeric input, the DATETIME type allows calendar selection, and the TEXT type and VARCHAR types over 500 allow multi-line input.
For columns that are not null-prohibited (no NOT NULL constraint), a check box will appear allowing the entry of a null value.
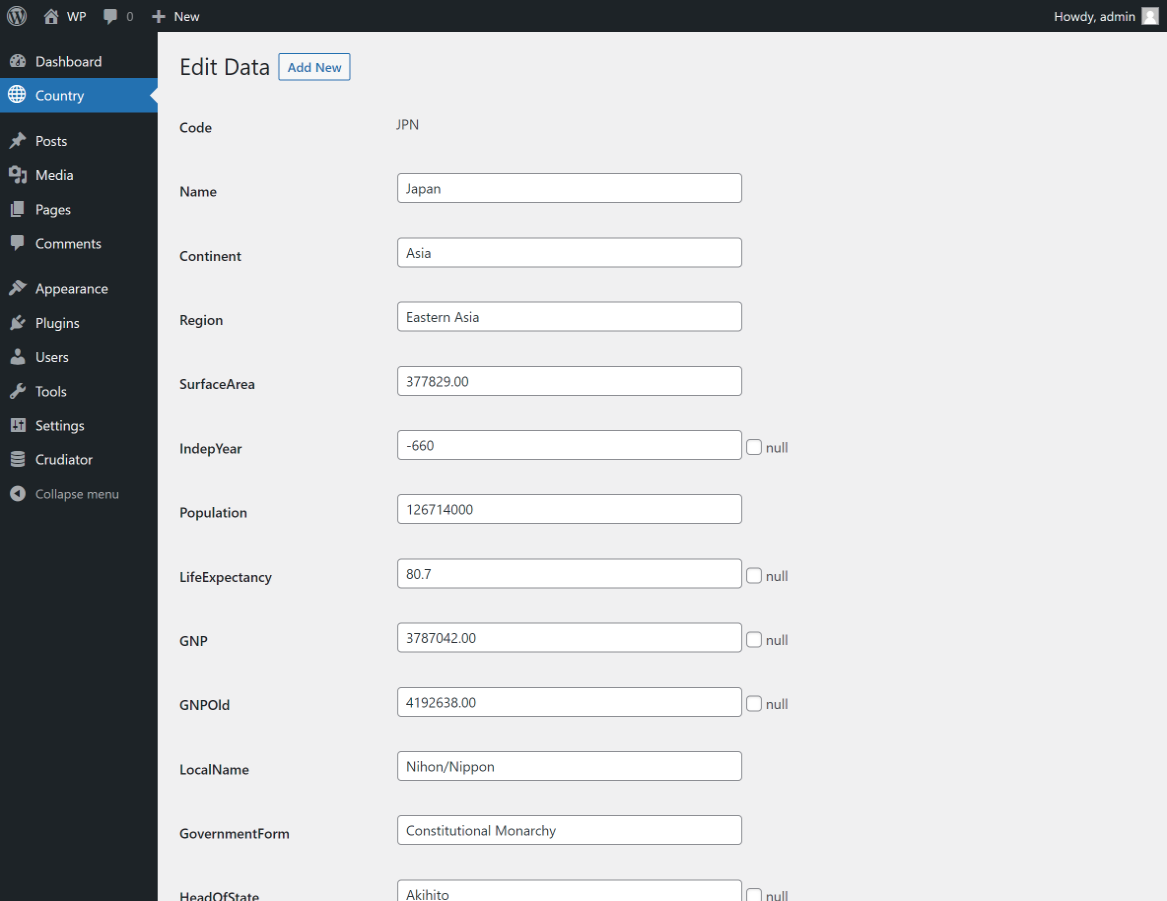
Data Update Screen
On the data listing screen, clicking the “Edit” link will take you to the data editing screen.
As in the Add New screen, an input form is automatically generated according to the data type of the table column, and the current value of the row you clicked on is entered.
Columns that are primary keys are not editable.
Data Deletion
In the data listing screen, clicking the “Delete” link will bring up a confirmation dialog asking if you want to delete the data.
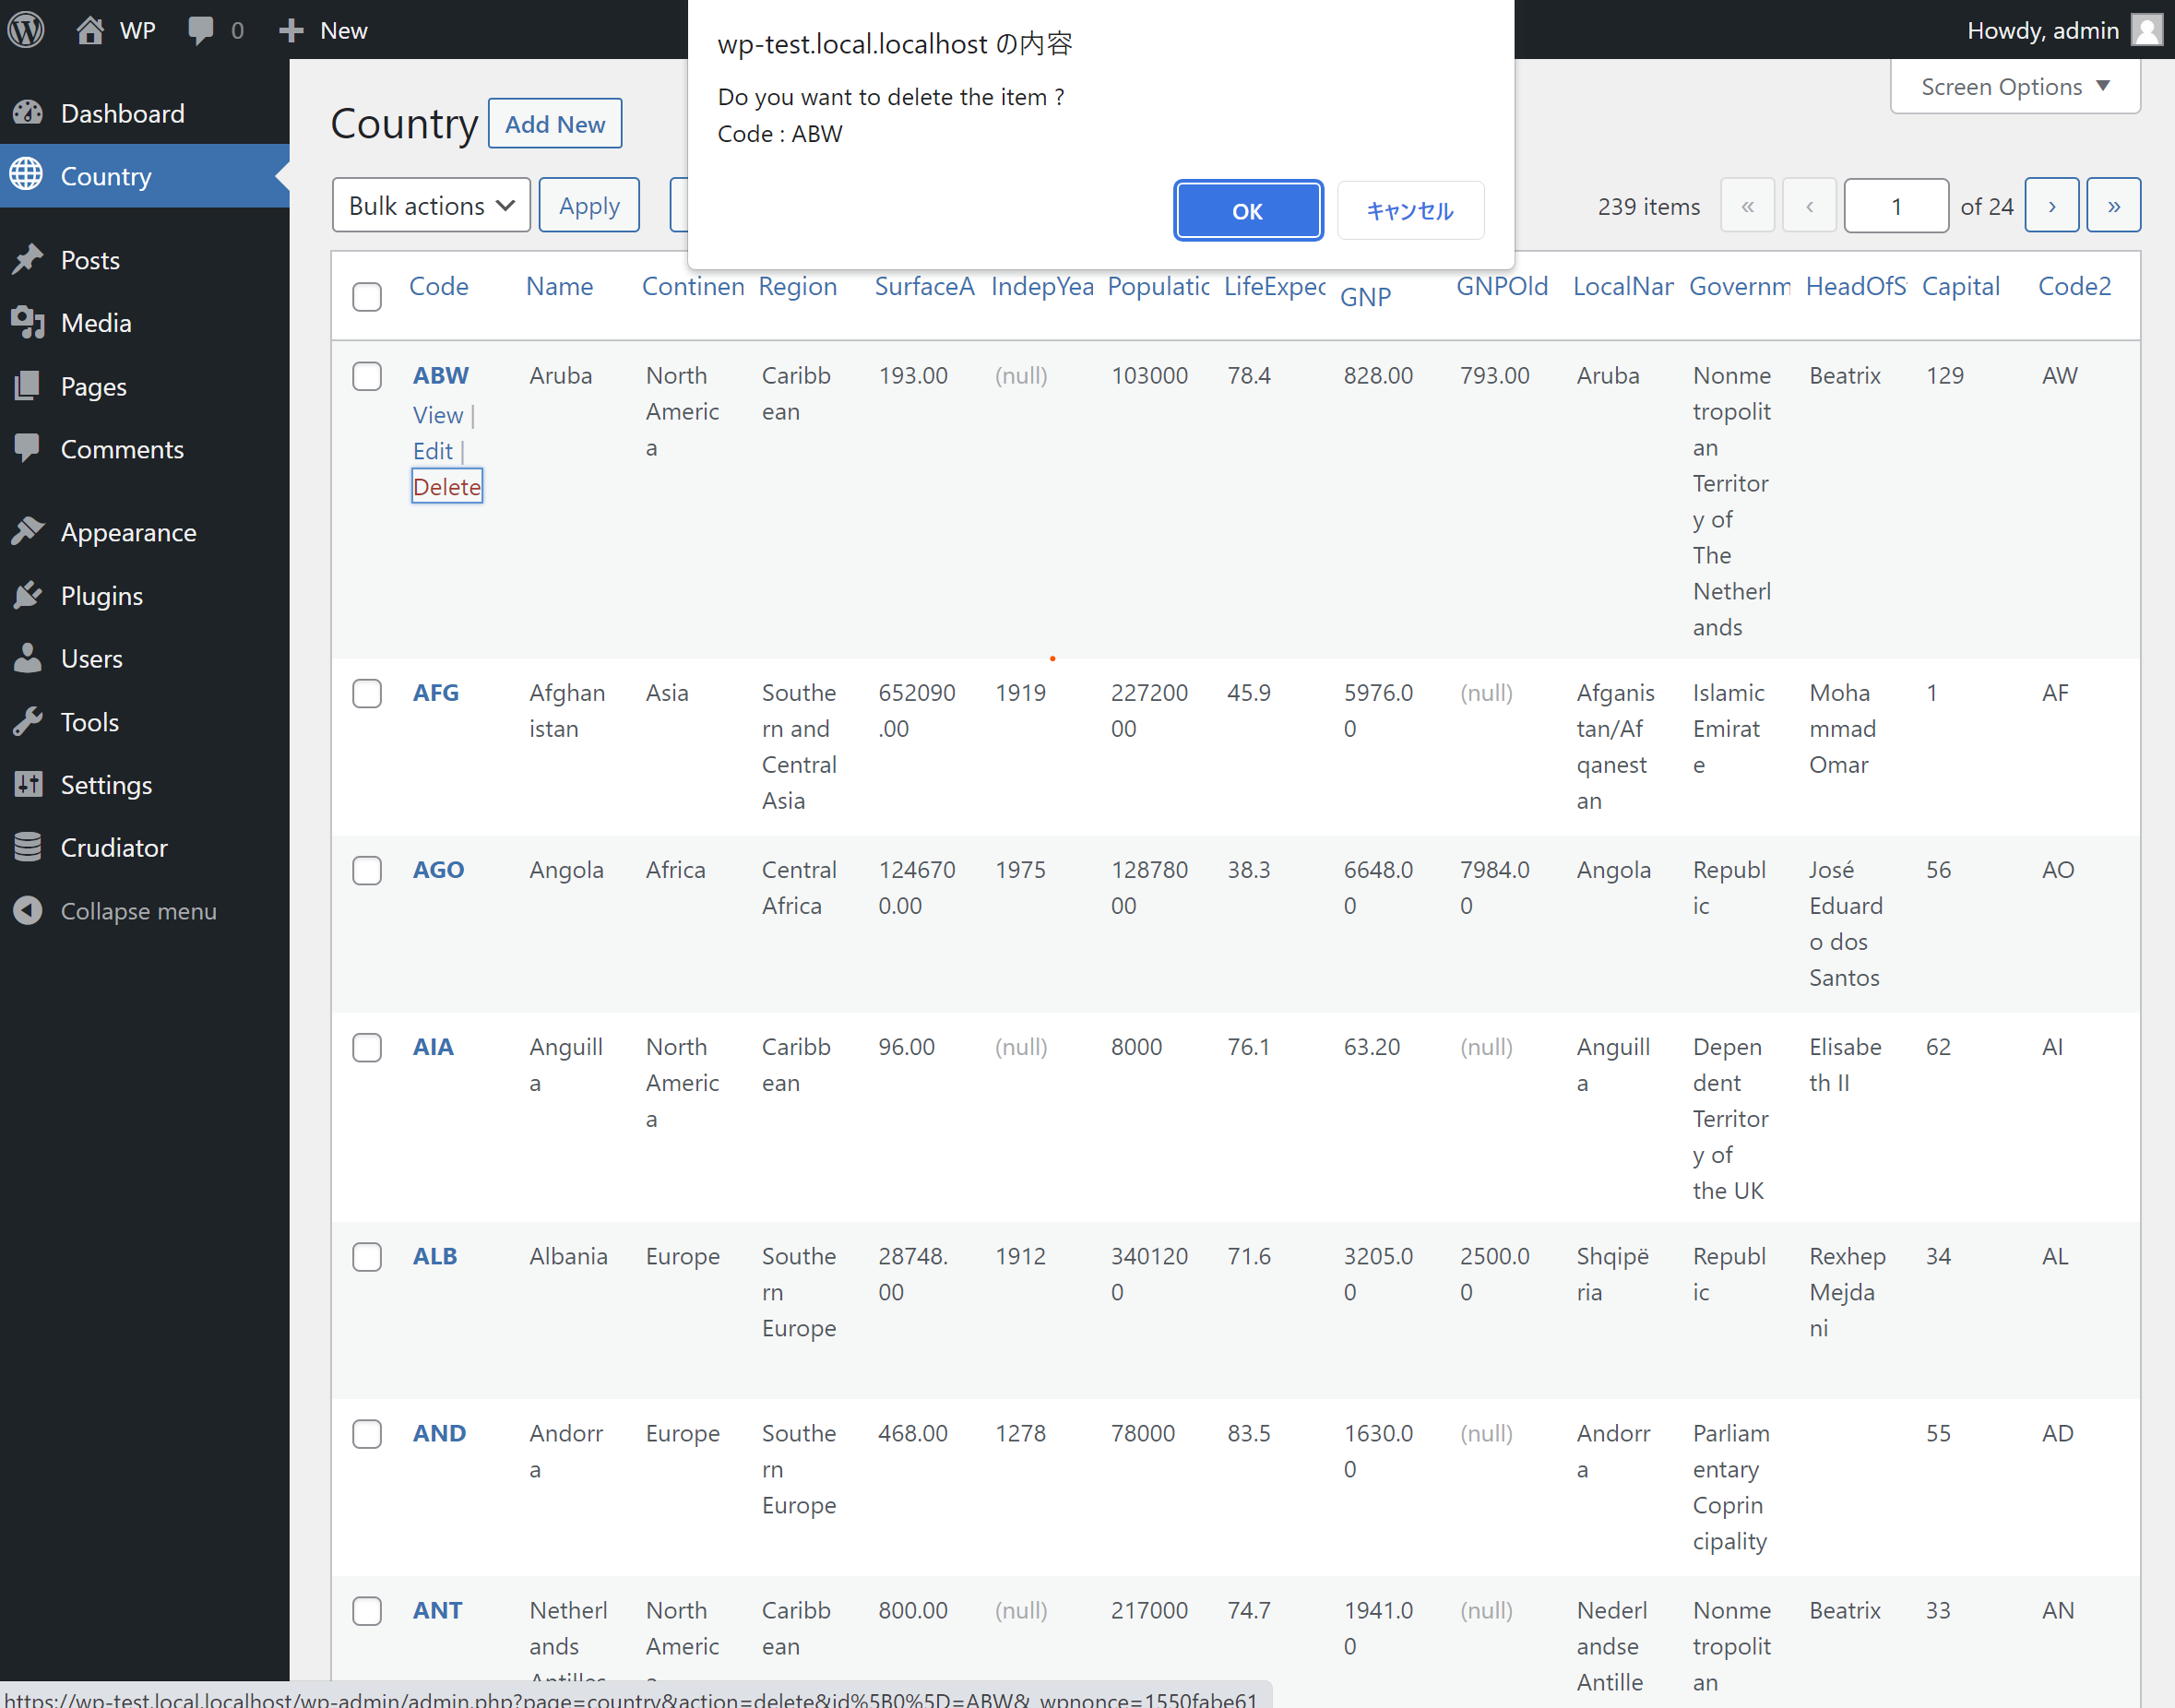
It is also possible to bulk delete by selecting the checkbox at the far left of the list. A confirmation dialog box will appear before deleting.

Basic Specification
Crudiator is a plugin that allows CRUD operations on custom tables with minimal configuration. Please note the following basic specifications in doing so.
If you use Crudiator, please read through this chapter for a better understanding.
In the initial state, detailed data display, add, edit, and delete are enabled.
When you register a menu with minimal settings using Crudiator, detailed view, create, edit, and delete data are enabled by default.
In some cases, you may want to disable ReadOnly screen or only delete.
In such cases, set the insert, detail, update, and delete parameters to false in the custom settings.
You can disable specific functions.
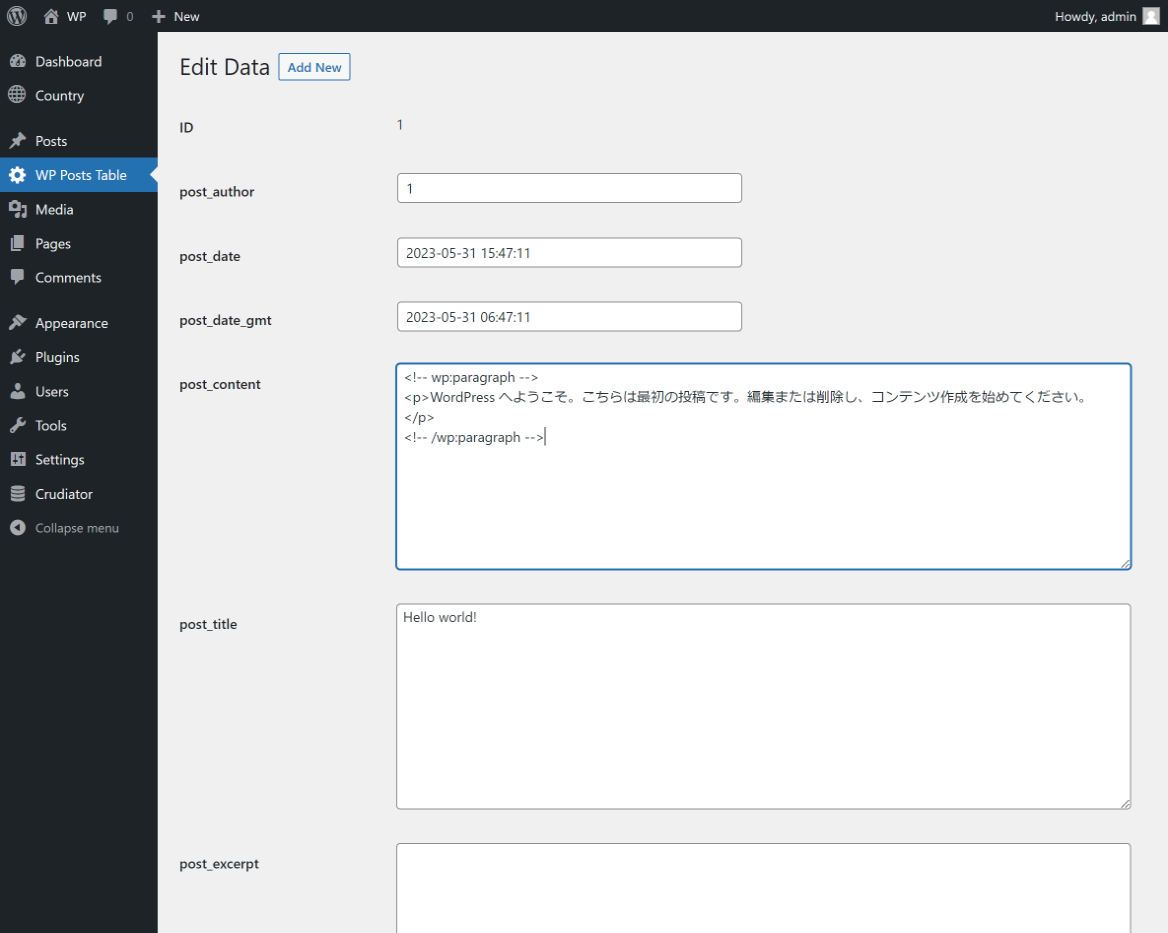
Columns that are long strings are hidden in the data list display screen.
In the data list display screen, columns with a data type of TEXT or VARCHAR (500) or higher are not displayed by default because they are less visible.
For example, if you register wp_posts, a WordPress post table, the screen will look like the following. The post_content column, which is the body of the post, is not displayed.

However, it is displayed on the Add New and Edit screens.
If you want to display columns with data type TEXT or VARCHAR (500) or higher even in the list screen, you can do so by setting the columns or list_columns option in the custom settings.
The input type is automatically determined according to the data type on the Add New and Edit Data screens.
In Crudiator, input forms are automatically generated according to the data type of the table columns registered in the menu.
The following rules are used for automatic generation.
| Data type | Input form |
|---|---|
| Numeric types such as int and float types | One-line text input with only numbers, signs, and decimal points allowed |
| textarea,varchar(500 or more),json | Multi-line text input |
| datetime | Dialog with selectable date and time |
| date | Dialog with selectable date |
| time | Dialog with selectable time |
| otherwise | One-line text input |
Also, if CHARACTER_MAXIMUM_LENGTH can be obtained from the MySQL column information, the value is automatically set to the maxlength attribute.
If you wish to change to any input type on the Add/Edit Data screen, please set the input_type in the Custom Settings. With custom settings, you can also use drop-down and radio button input forms, etc.
AUTO_INCREMENT and DEFAULT CURRENT_TIMESTAMP are automatically excluded from the input
In MySQL, the AUTO_INCREMENT column attribute is often used for sequential numbering, and the DEFAULT CURRENT_TIMESTAMP column attribute is often used to automatically set the current time to the data creation date.
Crudiator automatically recognizes such columns and excludes them from input items in input forms.
Specifically, the specifications are as follows
| Column attribute | Add New Screen | Edit Screen |
|---|---|---|
| PRIMARY KEY | Display if not AUTO_INCREMENT | uneditable |
| AUTO_INCREMENT | non-display | uneditable |
| DEFAULT CURRENT_TIMESTAMP | non-display | uneditable |
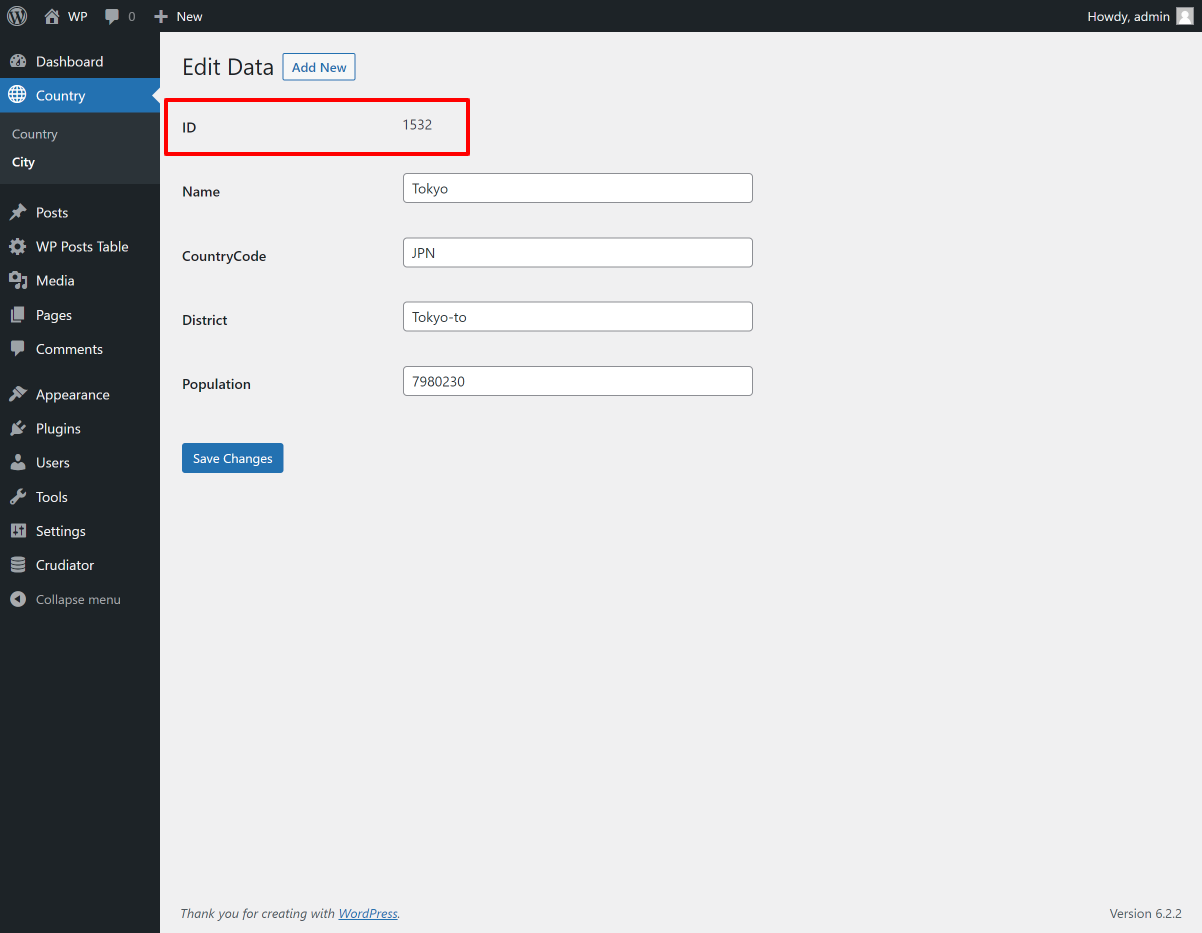
For example, the city table in the MySQL sample data world database is not displayed on the add new screen because the primary key is an ID column and AUTO_INCREMENT, and is displayed as uneditable on the edit screen.

In addition, in the countrylanguage of the world database in the MySQL sample data, the primary key is a compound key of CountryCode and Language, so it can be entered in the Add New screen, but cannot be edited in the Edit screen.

Fields that are left blank on the Add New Data screen will override the column default values.
In the Add Data screen, items that are saved without any values entered in the input form are not set as values in the SQL query, and the default values of the columns are given priority.
This is because an error may occur depending on the column definition if an unentered value is considered as a blank character and an empty character is saved as it is.
This reduces the chance of stopping with an error when adding data.
In the data edit screen, if an empty value is set, the empty character is saved.
Data cannot be added, edited, or deleted in tables without a primary key
For tables without a primary key, the edit and delete functions are disabled by default due to the difficulty of identifying a single record.
Custom Settings
If you do not specify custom settings when adding a Crudiator, most basic features are enabled.
Depending on your requirements, you may want to disable certain features. In such cases, you can take advantage of the custom settings.
This section explains how to use custom settings.
Sample data from the official MySQL website is used in this explanation. Please refer to them as necessary.
Custom Option List
Here is a list of custom setting options that can be used in Crudiator.
| option name | type | default value |
description |
|---|---|---|---|
| Common column settings | |||
columns |
array | (none) | Specify the column names and the order in which you want them to appear on the entire screen. ex: ["id", "name", "age"].only these three columns will be displayed. You can also add your own columns other than the table columns. In that case, the filtering process described below can be used to display custom values. |
display_as |
object | (none) | Display the column string with the specified string Ex) {"name": "Name", "age": "Age"}The “name” column will display “Name” and the “age” column will display “Age”. This applies to all screens and export csv files. |
| Data Listing | |||
list_columns |
array | (none) | Specify the columns you want to be displayed only in the list view. If specified, this takes precedence over the colums parameter. |
list_order |
object | (none) | Specifies the default data order. Pass column name as key and ASC or DESC as value. Ex) {"id": "DESC"}.If set like this, the data will be displayed in descending order by id. |
list_sortable_columns |
array | (none) | Specify the columns that can be sorted. Ex) ["id", "age"].only these two columns can be reordered. |
where |
array | (none) | Apply default filtering to the data. Specified with Medoo’s where syntax. The usage is explained in detail below. |
views |
array | (none) | Add a view link, a familiar WordPress feature. Specified with Medoo’s where syntax. How to use it is explained in detail below. |
| Add new data | |||
insert |
bool | true |
Enables/disables the add new data function. |
insert_columns |
array | (none) | Specify the columns you want to be displayed only on the add new screen. If specified, this takes precedence over the colums parameter. |
| Detailed data display | |||
detail |
bool | true |
Enables/disables the detailed data display function. |
detail_columns |
array | (none) | Specify the columns you want to be displayed only on the detail screen. If specified, this takes precedence over the colums parameter. |
| Data Update | |||
update |
bool | true |
Enables/disables the data editing function. |
update_columns |
array | (none) | Specify the columns you want to be displayed only during the update screen. If specified, this takes precedence over the colums parameter. |
| Deletion of data | |||
delete |
bool | true |
Enables/disables the data deletion function. If set to “false”, the bulk delete function in the list view is also disabled. |
| Filtering Data | |||
filter |
bool | true |
A setting of false disables the filtering function. |
filter_columns |
array | (none) | Specifies a column that can be used only when filtering data. If this is specified, it takes precedence over the colums parameter. |
| Screen Options | |||
list_perpage |
bool | true | If set to false, the function to switch the maximum number of items displayed in the list view is disabled. |
list_perpage_number |
number | 10 | This is the initial value of the maximum number of items to be displayed in the list view. |
list_column_display_toggle |
bool | true | The ability to show/hide columns by the user in the display options. |
| Input Form | |||
input_type |
object | (none) | You can change how you Input Form values on the New and Update screens. The following sections explain in detail. |
description |
object | (none) | If you need a description on the input or edit screen, pass a string to this. html string can be reflected. Ex) {"name": "Please put a space between the first and last name"}.If set like this, the description will be displayed below the name input field. |
require_columns |
array | (none) | Specify a required column. If you specify this, the browser will warn you if you try to save with an empty string. |
autocomplete |
string | on |
If set to on, input suggestions will not be displayed when typing. But at the same time, the value being entered is also deleted in the browser back on error.This lacks usability, so the default is on. |
| Export function | |||
export |
bool | true |
Setting false disables the export function. |
export_columns |
array | (none) | Specify the columns you want to appear only in the export csv file. If specified, this takes precedence over the colums parameter. |
| Debug function | |||
debug |
boolean | false | If set to true, you can check the SQL to be executed. |
Disabling specific functions(input, detail, update, delete…)
Depending on your requirements, you may want to automatically add data from the system and view it, but not edit or delete it.
In such cases, you can disable certain functions in the custom settings. For example, if you want to disable data insertion, editing, and deletion, write the following json.
{
  "insert": false,
  "update": false,
  "delete": false
}
The Add New button, Edit link, and Delete link will now disappear from the list screen. You will not see that screen when you access it directly.
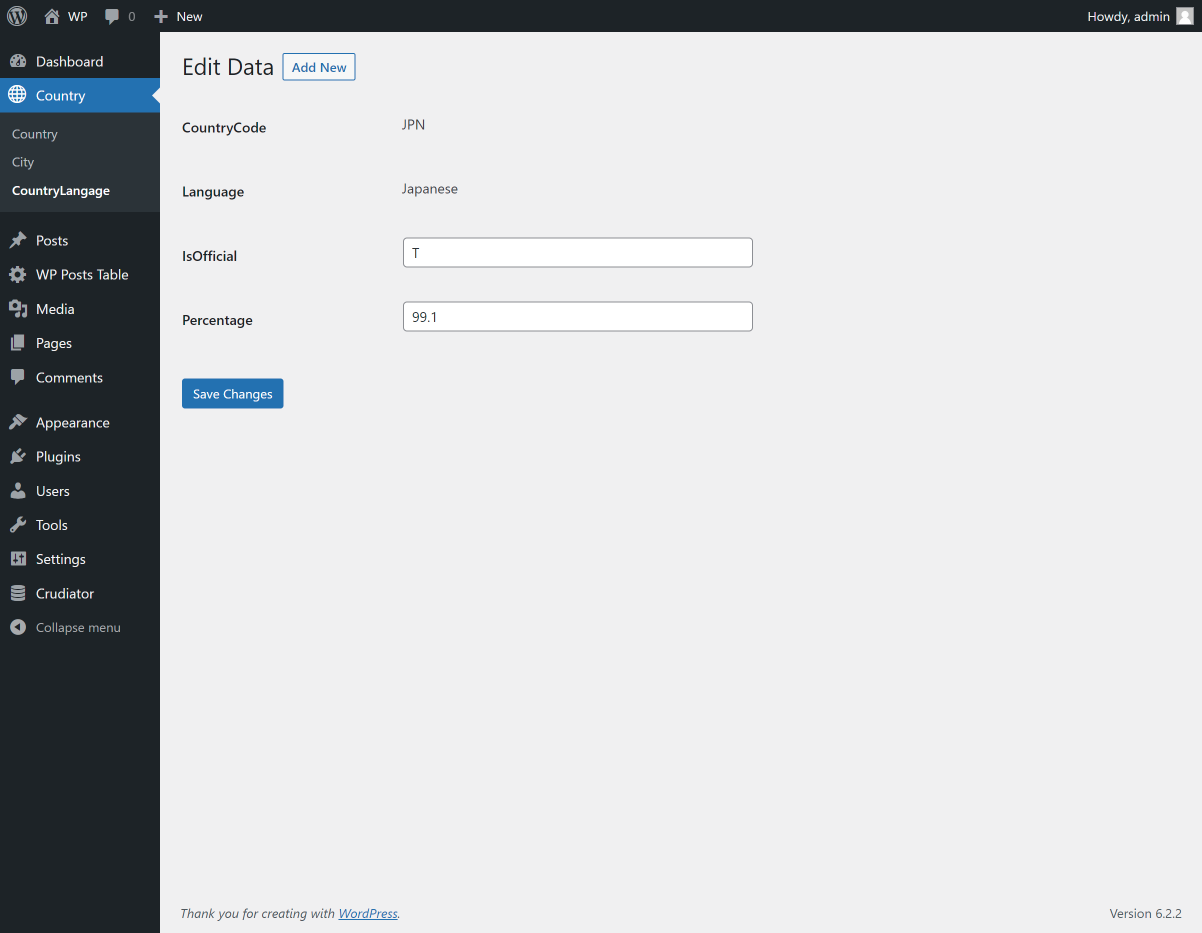
Change column name ( display_as )
Crudiator uses the column name strings from the custom table as is. In some cases, you may want to change these to more descriptive strings.
In such cases, the display_as option can be used to change the display names of the columns.
For example, if you want to change the column names in the CountryLanguage table in the MySQL sample data, you would write the following json. The column name is passed as the key and the string you want to display as the value.
{
    "display_as": {
    	"CountryCode": "Country Code",
    	"Language": "Language",
    	"IsOfficial": "Officeial Language",
    	"Percentage": "Usage Rate"
    }
}
This will cause the column names on the various screens to be displayed with the specified strings.

The names of columns in the Add New screen and Filter Data screen also change in conjunction with the display name.

This string will also appear in the header of the exported csv file.
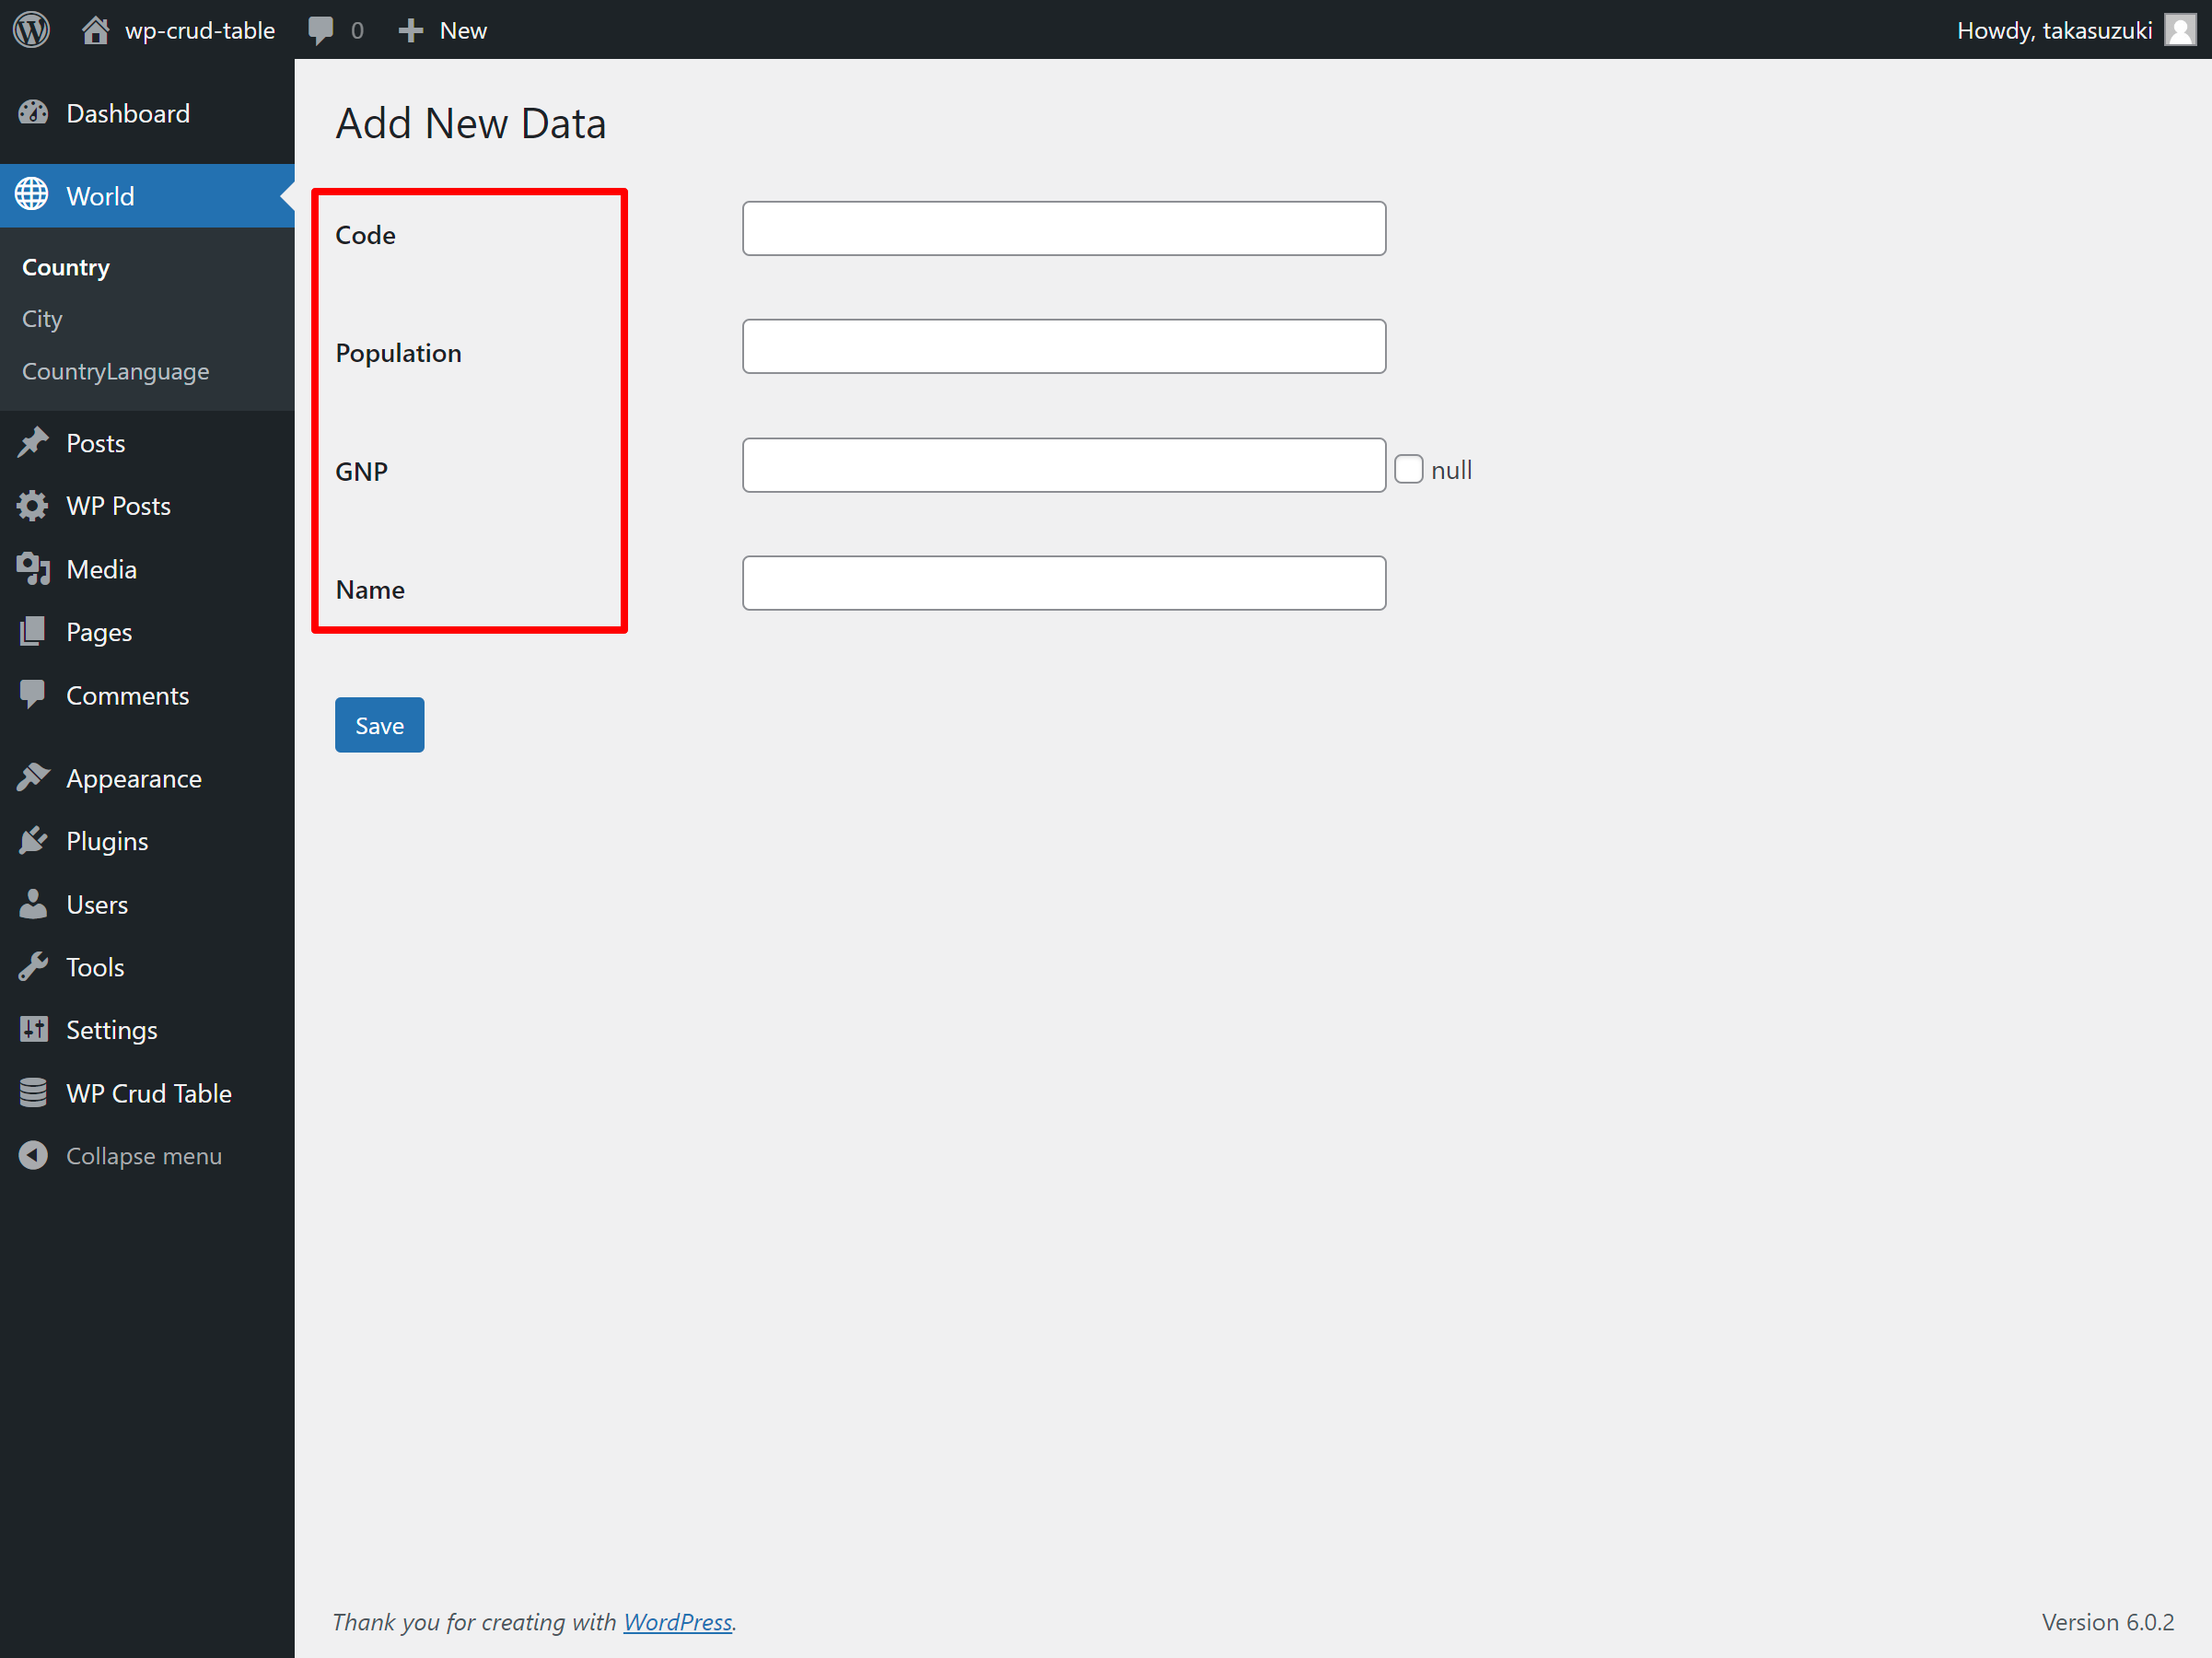
Change display columns ( columns, list_column, insert_columns… )
Crudiator initially displays all columns of the custom table. (However, columns that are too long will not be displayed in the list screen.)
For example, the Country table in the MySQL sample data has 15 columns, so if nothing is set, the following columns will be displayed.

If you want to select the columns to be displayed here or set the order in which they are displayed, specify the columns option.
Here, we will specify the columns Country Code, Population, GNP, and Country Name, and the column order.
{
  "columns": ["Code", "Population", "GNP", "Name"]
}
Only the specified column names are now displayed and in order.

The columns option also applies to the new add screen, edit screen, detail view, filter data, and export columns.
For example, the Add New screen looks like this.
The columns option is a common column definition.
If you want to specify individual columns, use each of the following options.
| option name | Target screen |
|---|---|
list_columns |
List view screen This is used when you want to set up common columns in columns and change only the list view screen. |
insert_columns |
Add New screen |
detail_columns |
Detailed display screen |
update_columns |
Edit Screen |
filter_columns |
Selection columns for filtering data |
export_columns |
Columns when exported |
Description of Input Form ( description )
In the Add New Data and Edit Data screens, use the description option to add a description to each field of input.
For example, in the City table of the MySQL sample data, to add a description for each field when entering data, write the following json.
{
    "description": {
    	"CountryCode": "Please enter a 3-letter country code",
    	"Language": "Please enter a language name。",
    	"IsOfficial": "Enter T if the language is used as an official language, otherwise enter F.",
    	"Percentage": "Enter the <b>percentage</b> used as the language of the country."
    }
}
It will be displayed as a description when entered. html tags will also be applied.

Change input type(input_type)
The Crudiator automatically determines the input method to some extent on the Add Data and Edit Data screens, but the input_type option can be used to change the input method to any desired method. If used properly, you can create an Input Form that is easy for the user to fill out.
The input_type option specifies the column name as the key and each parameter as the value.
For example, if you want to create a form in which the user can select a blood type by clicking the radio button on the blood column, enter the following json file.
{
    "input_type": {
        "blood": {
            "type": "radio",
            "default": "A",
            "rule": {
                "A": "blood type A",
                "B": "blood type B",
                "O": "blood type O",
                "AB": "blood type AB"
            }
        }
    }
}
The screen will look like the following, which is an intuitive input field that allows you to narrow down the value of your input.

The parameters that can be set for each column in input_type are as follows.
| parameter | required | description |
|---|---|---|
type |
〇 | Set the input type to integer, text, textarea, radio, datetime, etc. A list of input types is described below. |
rule |
△ | This is required only if type is radio or dropdown, and defines the choices. |
default |
You can specify a default value. If you set this value, the Input Form on the Add New screen will be pre-populated with this value. |
|
placeholder |
Displays a description in light gray text that provides a hint for input. | |
maxlength |
You can set the maximum number of characters for integer, text, textarea, and other input types. |
Next, all types available in input_type are explained.
integer
Only numbers, minus signs, and decimal points can be entered.
text
This will be a one-line Text Input Form. It is effective to use placeholder and maxlength.
textarea
This will be a multi-line Text Input Form. It is effective to use placeholder and maxlength.
radio
The choices are entered using radio buttons, and the rule parameter is used to specify the choices.
If the rule parameter is passed in the form of a key-value object, the key is used as the value to be sent and the value as the display string.
If a simple array is passed as the rule parameter, the value of the array is used for both the value to be submitted and the display string.
dropdown
The input is a drop-down selection (using the select tag), and the rule parameter specifies the choices to be made.
If the rule parameter is passed in the form of a key-value object, the key becomes the value to be sent and the value becomes the display string.
If a simple array is passed as the rule parameter, the value of the array is used for both the value to be sent and the display string.
datetime
Enter the date and time in a calendar-style dialog.
date
Enter the date in a calendar-style dialog.
time
Enter the time in a dialog.
password
Characters at the time of input will be black circle.
Default data filtering settings ( where )
When using the Crudiator to display table contents, there may be data that you do not want or need to show beforehand.
In such cases, you can use the where option to filter the data by default.
Since Crudiator uses a library called Medoo for SQL execution, the where option is specified in Medoo syntax.
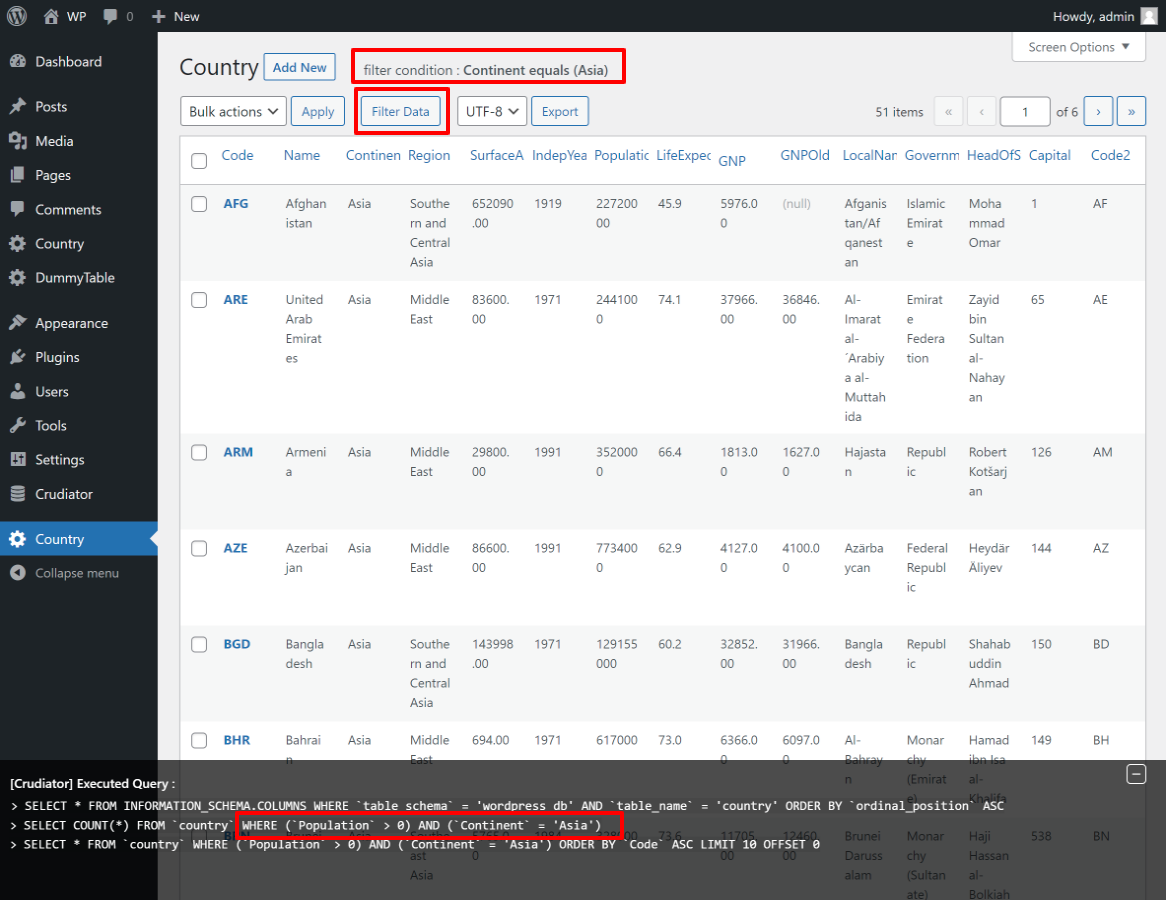
For example, in the Country table of the MySQL sample data, to prevent rows with a population of 0 from being displayed on the screen, write the following json.
{
    "where": {"Population[>]": 0}
}
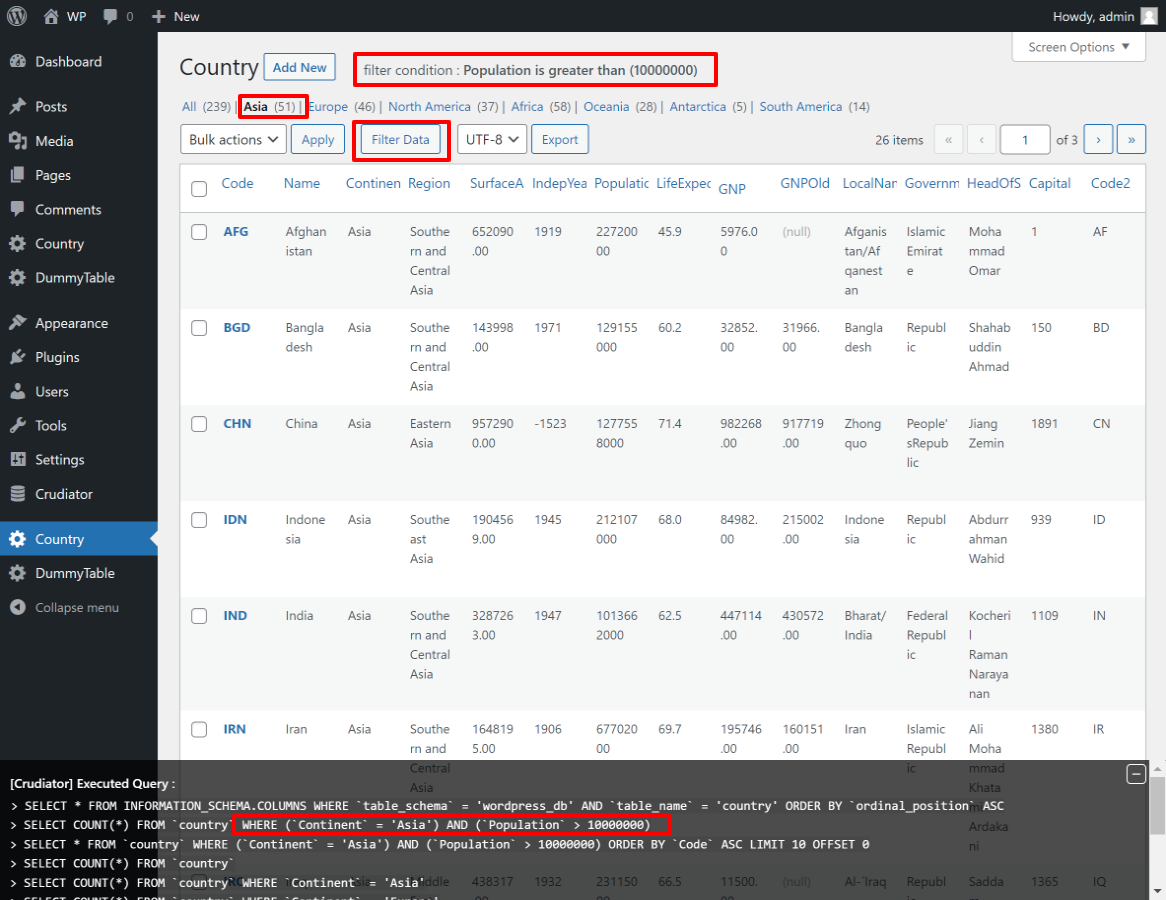
Then the Country table will show 232 cases instead of the original 239. In the following screen, the debug option is set to true so that we can check the SQL executed, and we can see that WHERE ( Population > 0 ) is applied.
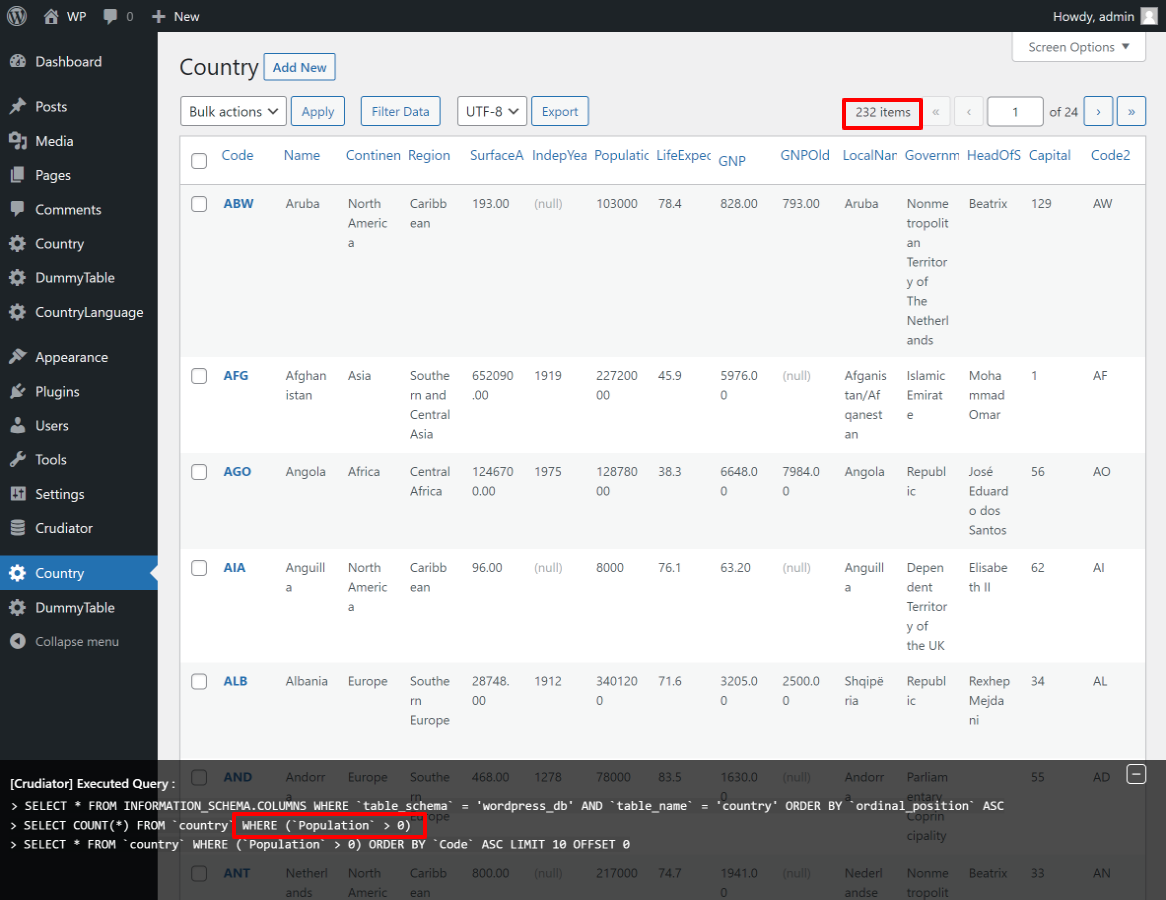
If you apply [Filter Data] in this state, the where option is applied and then the data filtering is applied, so you can see that it works as the default filtering.
How to describe conditions passed to the where option
The condition array passed in the where option can be written in a variety of SQL-compliant ways.
For single condition
The basic description follows Medoo’s where syntax. An example is shown below for reference.
| 演算子 | 記述例 | 展開SQL | 意味 |
|---|---|---|---|
| = | {"id": 100} |
id = 100 |
id is 100 |
| > | {"id[>]": 100} |
id > 100 |
id is greater than 100 |
| < | {"id[<]": 100} |
id < 100 |
id is less than 100 |
| >= | {"id[>=]": 100} |
id >= 100 |
id is greater than or equal to 100 |
| <= | {"id[<=]": 100} |
id <= 100 |
id is less than or equal to 100 |
| != | {"id[!]": 100} |
id != 100 |
id is not 100 |
| IS NULL | {"id": null} |
id IS NULL |
id is NULL |
| IS NOT NULL | {"id[!]": null} |
id IS NOT NULL |
id is not NULL |
| BETWEEN | {"price[<>]": [100, 200]} |
price BETWEEN 100 AND 200 |
price is more than 100 and less than 200 |
| BETWEEN | {"price[><]": [100, 200]} |
price NOT BETWEEN 100 AND 200 |
price is not more than 100 and less than 200 |
| IN | {"city": ["tokyo", "osaka", "nagoya"]} |
city IN ("tokyo", "osaka", "nagoya") |
city is equal to one of tokyo,osaka,nagoya |
| NOT IN | {"city[!]": ["tokyo", "osaka", "nagoya"]} |
city NOT IN ("tokyo", "osaka", "nagoya") |
city is not equal to any of tokyo,osaka,nagoya |
| LIKE | {"name[~]": "taka"} |
name LIKE %taka% |
name contains “taka” |
| NOT LIKE | {"name[!~]": "taka"} |
name NOT LIKE %taka% |
name does not contain “taka” |
For multiple conditions
For multiple conditions, the above condition array is a two-dimensional array.
For example, the condition that Continent is “Asia” and GNP is 1000 or more is described as follows
{
  "where": {
    "Continent": "Asia",
    "GNP[>=]": 1000
  }
}
At this time, the multiple condition conjunction will expand the following SQL connected to AND by default.
If you want to explicitly specify an OR or AND condition, use that conjunction as the upper key. (If they are the same key, add a comment with # according to Medoo syntax.)
{
  "where": {
    "OR": {
      "Continent #1": "Asia",
      "Continent #2": "Europe"
    }
  }
}
Combination of complex conditions
In some cases, you may want to specify the order of precedence in SQL by grouping them in parentheses.
For example, if you want to specify that age is more than 30, age is less than 50, and blood is A or B, you can use the following statement.
{
  "where": {
    "AND": {
      "AND #age": {
        "age[>=]": 30,
        "age[<]": 50
      },
      "OR #blood": {
        "blood #1": "A",
        "blood #2": "B"
      }
    }
  }
}
The following SQL will then be deployed.
WHERE ((`age` >= 30 AND `age` < 50) AND (`blood` = 'A' OR `blood` = 'B'))
This is useful when combining AND and OR.
To confirm that you have specified the condition as targeted, please utilize the debug option.
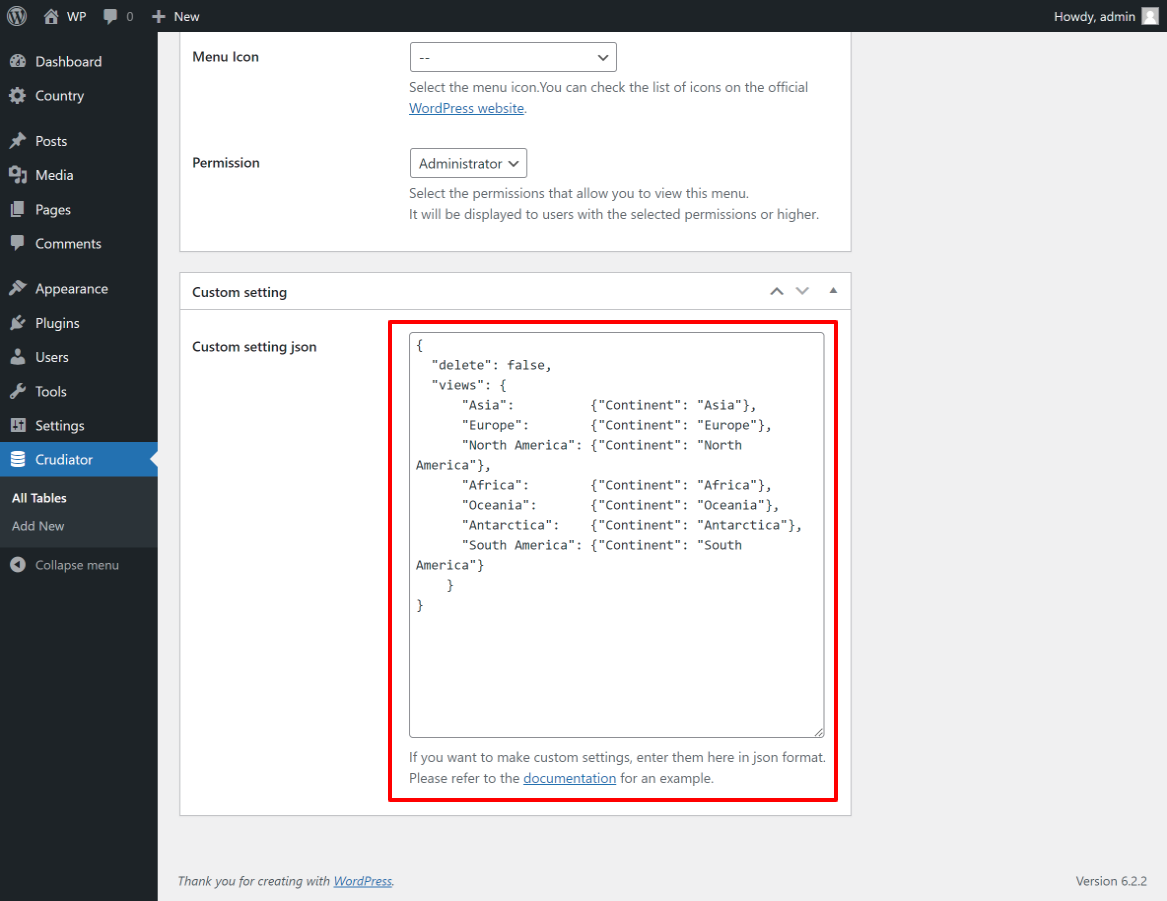
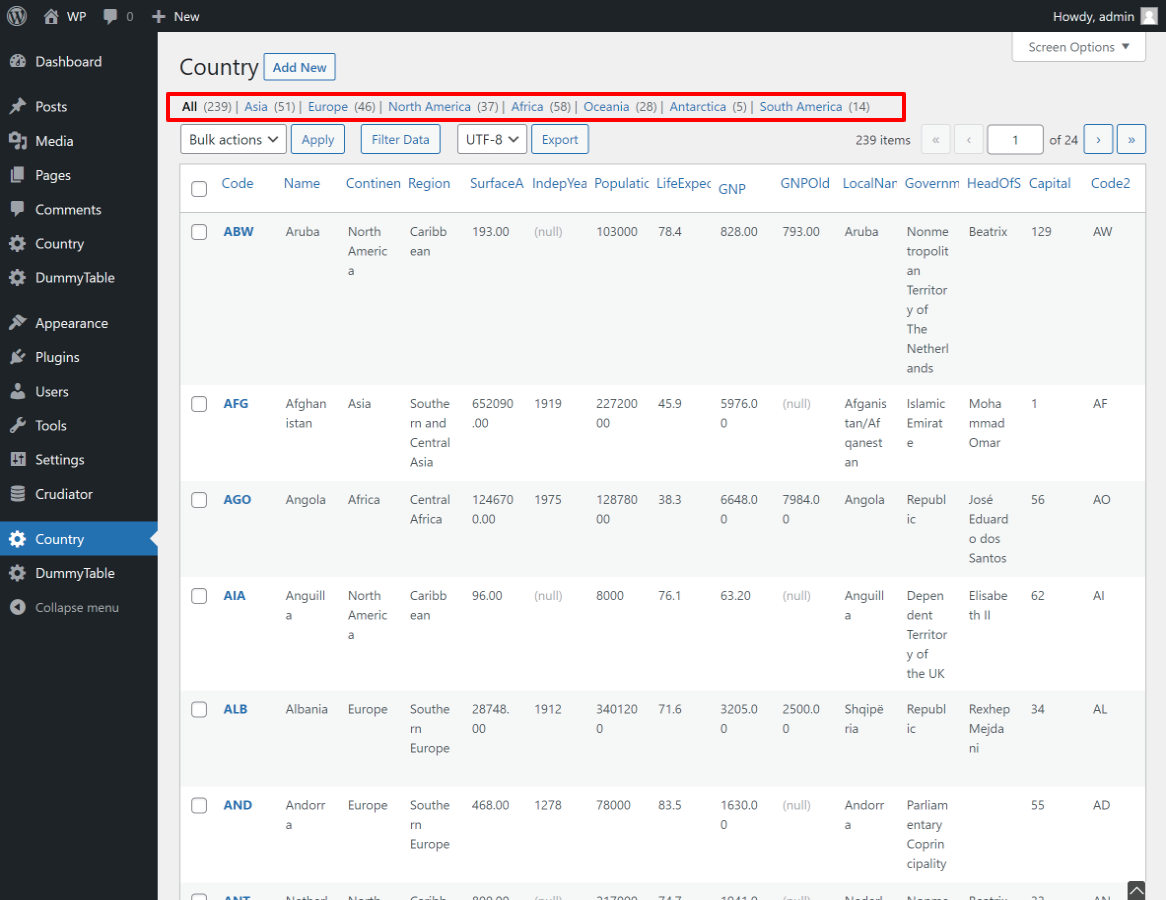
View Screen ( view )
There is a convenient view link in the upper left corner of the WordPress listings screen. Clicking on it takes you to a screen that displays only the data that matches your criteria.

Similarly, in Crudiator, you can provide a view link for frequently used filtering.
For example, in the country table of the MySQL sample data, we want to use this view link to categorize by continent in the Continent table, which means continent.
In such a case, you can use the views option to write a json like the following, which, like where, follows the Medoo where syntax in the basic way.
{
  "views": {
    "Asia":          {"Continent": "Asia"},
    "Europe":        {"Continent": "Europe"},
    "North America": {"Continent": "North America"},
    "Africa":        {"Continent": "Africa"},
    "Oceania":       {"Continent": "Oceania"},
    "Antarctica":    {"Continent": "Antarctica"},
    "South America": {"Continent": "South America"}
  }
}
You will then see the view links categorized by continent and the number of records for each continent in the upper left corner of the screen. The “All” will be added automatically at the beginning.
Click “Asia (51)” to display only those with Continent as Asia.
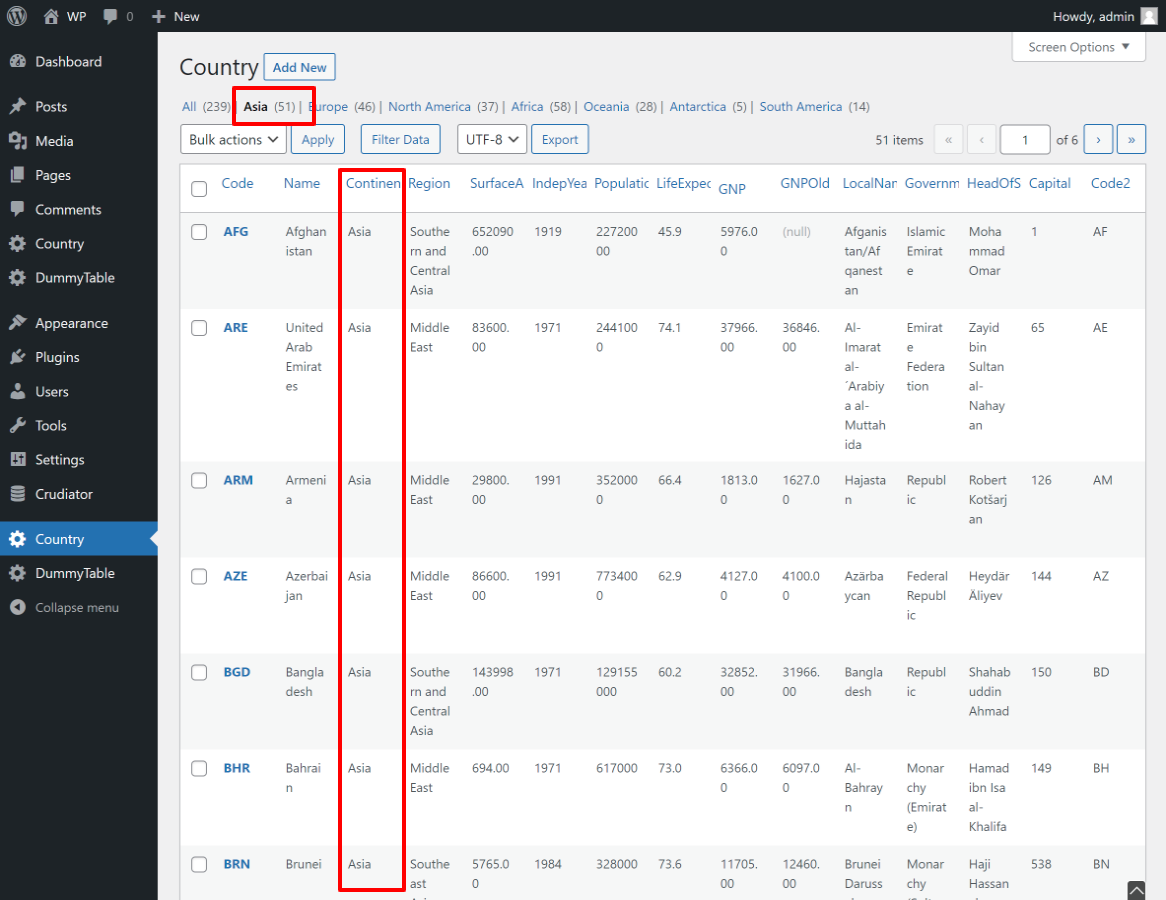
When “Filter Data” is applied in the View screen, the view conditions are applied and then the data filtering is applied.
Additional columns display
The Crudiator displays only columns from the target table, but sometimes you may want to add columns for items other than table columns.
In such cases, you can add your own columns with the columns option and use the filter hooks described at the bottom of this page to display your own values.
For example, to add a custom column named my_column to the countrylanguage table in the MySQL sample data, enter the following in the custom settings.
{
    "columns": ["CountryCode", "Language", "IsOfficial", "Percentage", "my_column"]
}
Then, using Crudiator’s filter hook, write the display process for my_column in functions.php in the theme folder.
<?php
add_filter("crudiator_custom_column_countrylanguage_my_column", function ($value, $item) {
  return "<button>button</button> | <a href='#'>link</a>";
}, 10, 2);
Then, your own columns will be added to the list view screen and the detail view screen. It can also be represented by arbitrary html, as in this sample code.

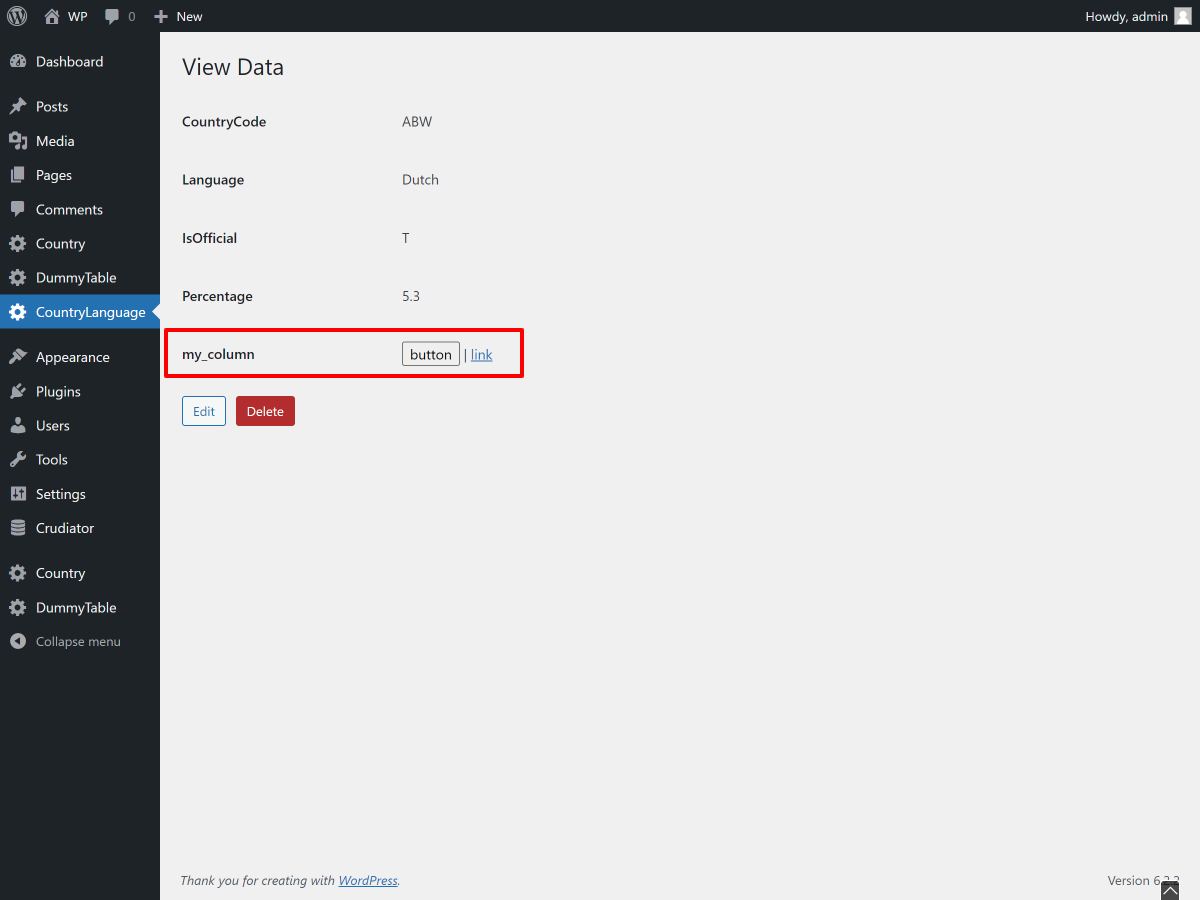
However, the custom columns do not support filtering or sorting of data.
WordPress Filters / WordPress Hooks
| Filter name / Hook name | type | argument | description |
| Filters for custom display of values | |||
crudiator_custom_column_{$slug_name}_{$column_name} |
filter | $value, $item | Customize what is displayed in the list and detail views. A separate section will explain in detail. |
crudiator_list_custom_column_{$slug_name}_{$column_name} |
filter | $value, $item | Customize what is displayed in the list views. |
crudiator_detail_custom_column_{$slug_name}_{$column_name} |
filter | $value, $item | Customize what is displayed in the detail views. |
| Filters and hooks for data manipulation | |||
crudiator_before_insert_{$slug_name} |
filter | $pre_insert_data | Allows callback processing before inserting data in a new screen. This is useful when there are validations or data changes. |
crudiator_after_insert_{$slug_name} |
action | $inserted_data | Allows callback processing after inserting data in a new screen. This is useful when there is additional processing after data insertion. |
crudiator_before_update_{$slug_name} |
filter | $pre_update_data | Allows callback processing before updating data in a new screen. This is useful when there are validations or data changes. |
crudiator_after_update_{$slug_name} |
action | $updated_data | Allows callback processing after updating data in a new screen. This is useful when there is additional processing after data insertion. |
crudiator_before_delete_{$slug_name} |
filter | $pre_delete_data | Callback processing can be performed before deleting data. If there is an error, return false to abort the deletion. |
crudiator_after_delete_{$slug_name} |
action | $deleted_data | Callback processing can be performed after deleting data. This is useful when there is additional processing after data deletion. |
crudiator_before_bulk_delete_{$slug_name} |
filter | $where_ary | Callback processing can be performed before bulk deleting data. If there is an error, return false to abort the bulk deletion. |
crudiator_after_bulk_delete_{$slug_name} |
action | $where_ary | Callback processing can be performed after bulk deleting data. This is useful when there is additional processing after data bulk deletion. |
Custom display of column values using WordPress filters
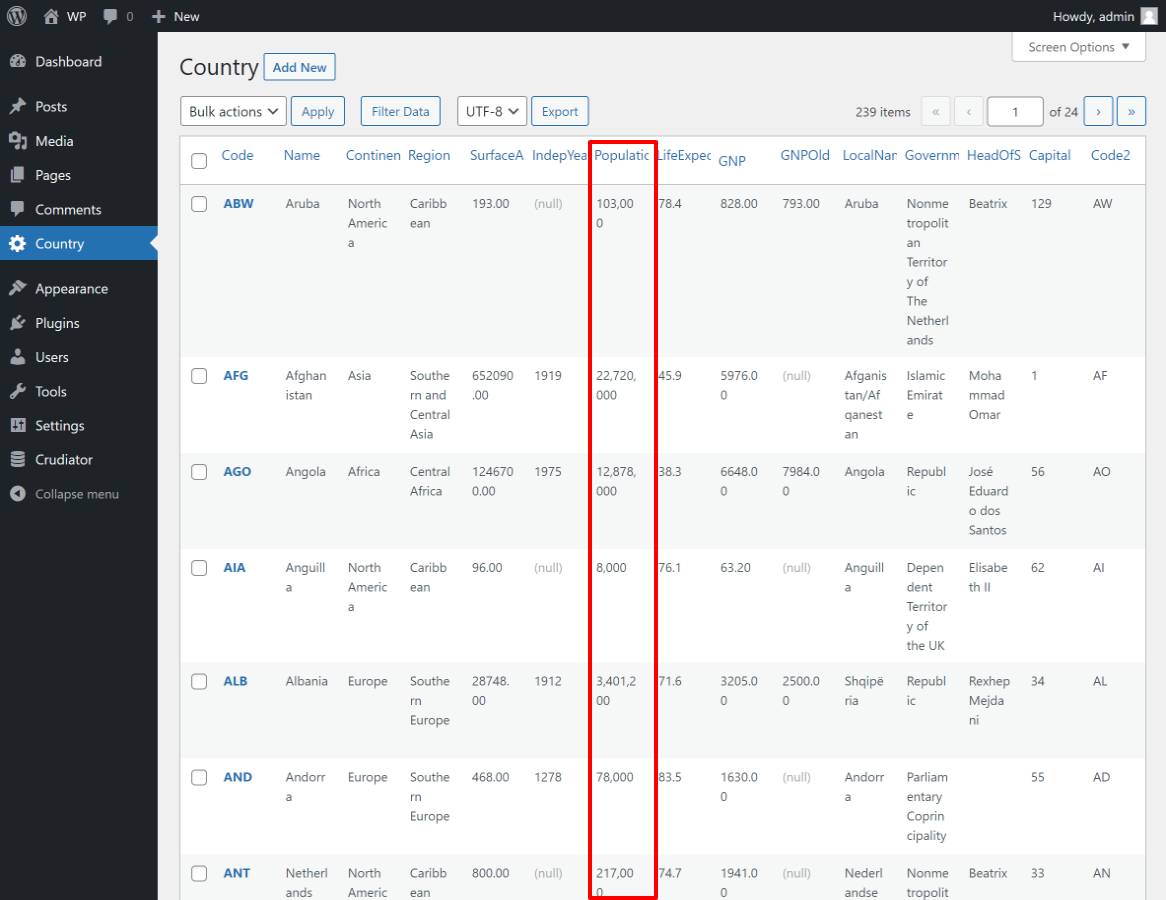
Basically, Crudiator outputs the database values as they are. However, in some cases, you may want to separate numbers into comma-separated values for easier reading, or to make a URL string into a link.
In such cases, the crudiator_custom_column_{$slug_name}_{$column_name} filter can be used to modify the values and display them.
For example, in the country table of the MySQL world database sample data, to separate the Population values into comma-separated columns of three digits, you would write the following in functions.php.
<php // functions.php
$slug_name = "country";
$column_name = "Population";
add_filter("crudiator_custom_column_{$slug_name}_{$column_name}", function ($value, $item) {
  return number_format($value);
}, 10, 2);
Thus, this string containing the slug name set in Crudiator and the table column name will be the filter name.
The callback function argument is passed an array containing the column value and the value of that record row, so use it in a good way in the function.
Then the Population value will be separated by three digits in the list view screen and the detail view screen.

If you want to apply it only to the list view screen, use crudiator_list_custom_column_{$slug_name}_{$column_name},
crudiator_detail_custom_column_{$slug_name}_{$column_name} if you want to apply it to the detail view only.
Callback processing during data manipulation
Crudiator allows you to execute your own callbacks at specific times during database operations.
This allows you to process data when adding or updating to the database, or to check values with your own validation before saving data, for example.
For example, when adding new data to a table with an age column, if there is a problem with the data, an error screen will be displayed; if there is no problem with the data, the data will be processed and saved to the database.
In this case, we use the crudiator_before_insert_{$slug_name} filter.
<?php // functions.php
add_filter("crudiator_before_insert_{$slug_name}", function ($data) {
  // validation
  if (isset($data["age"]) && $data["age"] < 0) { // error detect.
    $error_msg = "Age must be greater than 0.";
    return $error_msg;
  } else {
    // if data is correct, generate user id.
    $data["kana"] = uniqid();
    return $data;
  }
}, 10, 1);
If there is a problem with the transmitted data, an error text is returned and the text is displayed.

If the submitted data is OK, the data is processed and $data is returned, the value of which is stored in the database.
Basically, filter hooks are provided for processing before changes are made to the database, and action hooks are provided for processing after changes are made.
The following is a list of filter and hook processes that can be used with Crudiator.
crudiator_before_insert_{$slug_name}
Callback processing can be performed before data is inserted after being submitted from a new screen. This is useful when there are validations or data changes.
callback function
callback(array $pre_insert_data): mixed
parameter
$pre_insert_data
Data immediately before database insertion.
return value
If you return processed $data or plain $data, it will be inserted into the database.
If a string is returned instead of $data, no data is inserted and an error screen is displayed.
ex
<?php // functions.php
add_filter("crudiator_before_insert_{$slug_name}", function ($pre_insert_data) {
  if ( !my_validation($pre_insert_data) ){
    $error_msg = "validation error.";
    return $error_msg;
  }
  return $pre_insert_data;  // validation ok.
}, 10, 1);
crudiator_after_insert_{$slug_name}
Callback processing can be performed after data is inserted after being submitted from a new screen. This is useful when you want to do something after a successful insertion.
callback function
callback(array $inserted_data)
parameter
$inserted_data
Data immediately after database insertion. The data is retrieved again from the database.
ex
<?php // functions.php
add_action("crudiator_after_insert_{$slug_name}", function ($inserted_data) {
  // do something...
}, 10, 1);
crudiator_before_update_{$slug_name}
Callback processing can be performed before data is submitted from the edit screen and updated. This is effective when there are validations or data changes.
callback function
callback(array $pre_update_data): mixed
paramter
$data
Data immediately prior to database update.
return value
If you return processed $data or just $data, it will be updated in the database.
If a string is returned instead of $data, the data will not be updated and an error screen will be displayed.
ex
<?php // functions.php
add_filter("crudiator_before_update_{$slug_name}", function ($pre_update_data) {
  if ( !my_validation($pre_update_data) ){
    $error_msg = "validation error.";
    return $error_msg;
  }
  return $pre_update_data;  // validation ok.
}, 10, 1);
crudiator_after_update_{$slug_name}
Callback processing can be executed after the data is sent from the edit screen and updated. This is useful when you want to do something after a successful update.
callback function
callback(array $updated_data)
paramter
$updated_data
Data immediately after database update. The data is retrieved again from the database.
ex
<?php // functions.php
add_action("crudiator_after_update_{$slug_name}", function ($updated_data) {
  // do something...
}, 10, 1);
crudiator_before_delete_{$slug_name}
You can execute a callback process before data is deleted by pressing the delete link from the list screen, etc. This can be stopped when there is some error that should not be deleted.
callback function
callback(array $pre_delete_data): mixed
parameter
$pre_delete_data
Data immediately before deletion from the database.
return value
If $data is returned, this data will be deleted from the database.
If a string is returned instead of $data, no data is deleted and an error screen is displayed.
ex
<?php // functions.php
add_filter("crudiator_before_delete_{$slug_name}", function ($pre_delete_data) {
  if ( !my_validation($pre_delete_data) ){
    $error_msg = "validation error.";
    return $error_msg;
  }
  return $pre_delete_data;  // validation ok.
}, 10, 1);
crudiator_after_delete_{$slug_name}
The callback process can be executed after data is deleted by pressing the delete link from the list screen, etc. This is useful when you want to do something after a successful deletion.
callback function
callback(array $deleted_data)
paramter
$deleted_data
Data immediately after database update.
ex
<?php // functions.php
add_action("crudiator_after_delete_{$slug_name}", function ($deleted_data) {
  // do something...
}, 10, 1);
crudiator_before_bulk_delete_{$slug_name}
Callback processing can be executed before processing a batch of data by pressing “Bulk Processing” from the list screen, etc. This can be stopped if there is an error before batch processing.
callback function
callback(array $where_ary): mixed
paramter
$where_ary
Array of primary keys to be bulk deleted.
return value
If $where_ary is returned, this data will be deleted from the database.
If a string is returned instead of $where_ary, the data is not deleted and an error screen is displayed.
crudiator_after_bulk_delete_{$slug_name}
Callback processing can be executed after bulk processing of data from the list screen, etc. is pressed. This is useful when you want to do something after a successful batch processing.
callback function
callback(array $where_ary)
paramter
$where_ary
An array of primary keys that have been bulk deleted.